Odin for Azure Local: A Community Tool Deep Dive
The Optimal Deployment and Infrastructure Navigator
I’m in the middle of writing The Hyper-V Renaissance, an 18-part series making the case for traditional Hyper-V with Windows Server 2025 as a serious virtualization platform. It’s been consuming most of my writing time, and I’ve been heads-down on TCO comparisons, cluster builds, and PowerShell automation.
But sometimes you stumble across something that deserves its own post, and you have to step away from the main project for a minute.
There’s a new community tool for Azure Local that’s worth your attention. It’s called Odin, the “Optimal Deployment and Infrastructure Navigator”, and it’s hosted right on Microsoft’s GitHub. Before you get too excited, let me set expectations: this tool comes with a clear disclaimer that it’s provided “as-is, without Microsoft support.” It’s experimental.
But it’s also genuinely useful, and it reveals some interesting things about where Azure Local is headed.
I’ve spent some time clicking through every option, and I want to share what I found, the good, the gaps, and the “coming soon” features that hint at Microsoft’s roadmap. Then it’s back to the Hyper-V series.
Tool URL: azure.github.io/odinforazurelocal
Table of Contents
- Table of Contents
- What Is Odin for Azure Local?
- The Three Pillars of Odin
- Odin Sizer Tool
- Odin Knowledge
- Odin Designer (Main Configuration Wizard)
- Section 01: Deployment Type
- Section 02: Azure Cloud
- Section 03: Region
- Section 04: Cluster Configuration
- Section 05: Cluster Size
- Section 05.5: Cloud Witness
- Section 06: Storage Connectivity
- Section 07: Network Adapter Ports
- Section 08: Network Traffic Intents
- Section 09: Outbound Connectivity
- Section 10: Arc Gateway
- Section 11: Proxy Configuration
- Section 12: Private Endpoints
- Section 13: Management Connectivity
- Section 14: Management VLAN
- Section 15: Infrastructure Network
- Section 16: Storage Pool Configuration
- Section 17: Active Directory
- Section 18: Security Configuration
- Section 19: Software Defined Networking
- Generating Reports and ARM Templates
- Designer: Final Thoughts
- Summary: Strengths, Gaps & Wishlist
- Who Should Use Odin?
- Conclusion
- Resources
What Is Odin for Azure Local?
Odin is a browser-based wizard that walks you through the decisions required to configure an Azure Local deployment. It’s a decision tree, you make selections, and it guides you through the implications of those choices.
The tool covers:
- Deployment type (Hyperconverged, Multi-Rack, Disconnected, M365 Local)
- Azure cloud and region selection
- Cluster configuration and sizing
- Storage connectivity options
- Network adapter and traffic intent configuration
- Outbound connectivity and proxy settings
- Identity (Active Directory or Local Identity with Key Vault)
- Security configuration
- Software Defined Networking options
At the end, you can preview your cluster configuration, generate a detailed design document explaining the decision logic behind your selections, and export ARM deployment parameters (with placeholders for uncollected values).
The current version is 0.14.52, but when when i first started to write this blog it was written for version 0.12.5. Since then the group that maintains this tool has acatually been very responsive to feed back and even from my oringaial blog to what I will be publishing the Designer part of Odin for Azure Local has changed greatly.
Odin also includes:
- A Sizer tool for estimating cluster capacity based on workloads (Azure Local VMs, AKS Arc clusters, Azure Virtual Desktop)
- A Knowledge base with in-depth guidance on outbound connectivity, Arc Gateway, and private endpoints
As an open-source, community-built tool hosted on GitHub (https://github.com/azure/odinforazurelocal), Odin comes with a clear disclaimer: it’s provided “as-is, without Microsoft support” and is experimental. However, it’s actively maintained and helps IT architects validate cluster designs and accelerate Azure Local learning.
The Three Pillars of Odin
Odin is built around three interconnected tools that address different phases of Azure Local planning:
- Designer , The main configuration wizard that generates deployment parameters and documentation
- Knowledge Base , Deep-dive documentation on connectivity, networking, and architecture decisions
- Sizer Tool , Capacity planning and workload estimation before you buy hardware
Each tool can be used independently, but they work best together: use the Sizer to understand your capacity needs, reference the Knowledge Base when you hit complex networking decisions, and run through the Designer to generate your baseline configuration. Let’s look at each one.
Odin Sizer Tool
Preview Release: This tool helps you estimate Azure Local cluster requirements based on workload scenarios. Results are estimates and should be validated with your hardware vendor.
📝 Section Updated , February 24, 2026: This section has been rewritten to reflect the current Odin Sizer (version 0.17.04). The tool has changed significantly since this post was first published.
I’m genuinely excited to see a community-driven sizing tool for Azure Local. Odin’s Sizer is a practical, scenario-focused start: you can add workloads (Azure Local VMs, AVD, AKS Arc clusters), set node counts and VM profiles, and define per-node storage capacity (disks per node, capacity per disk, and disk type). Requirement summaries and live capacity graphs update in real time, and the page offers a Word report plus a browser print/“Save as PDF” option while saving session state in the browser, handy for quick planning and comparisons.
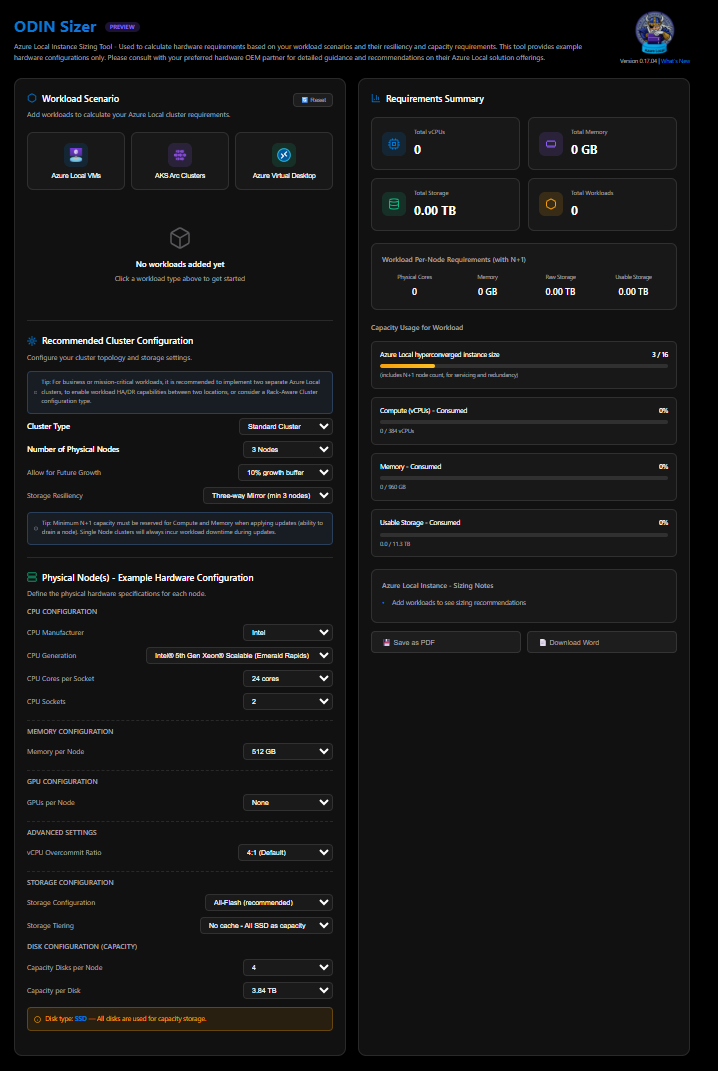
Workload Scenario
The first panel is where you build your demand picture. Click a workload type to add it:
| Workload | Inputs |
|---|---|
| Azure Local VMs | Workload name, vCPUs per VM, memory per VM (GB), storage per VM (GB), number of VMs |
| AKS Arc Clusters | Number of clusters, control plane node count / vCPUs / memory, work node count / vCPUs / memory / storage |
| Azure Virtual Desktop | User profile (Light / Medium / Power), number of users, per-profile specs (vCPUs, memory, storage) |
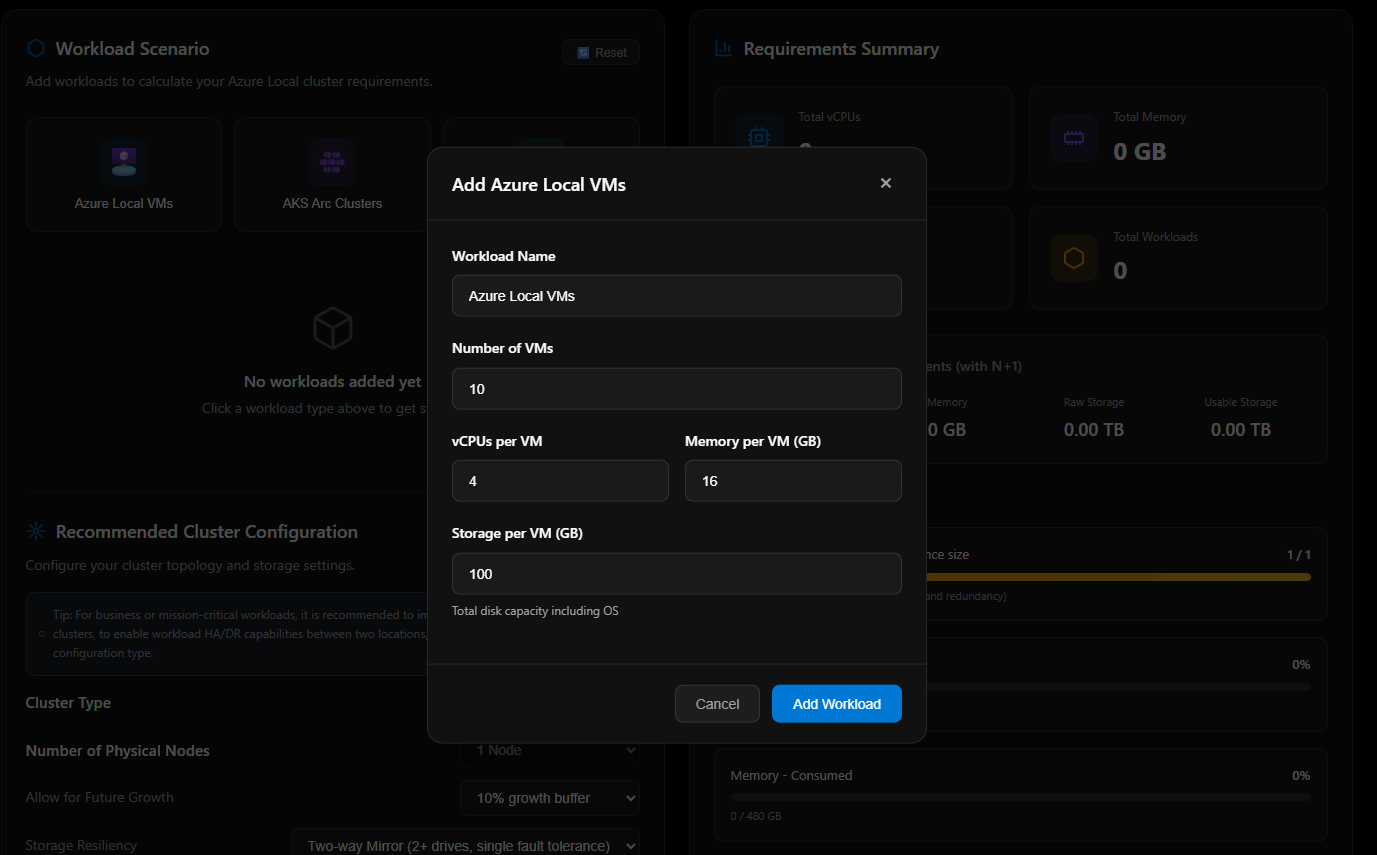
Recommended Cluster Configuration
Once you’ve added workloads, you define your cluster topology. The Cluster Type selection drives the behavior of every other input in this panel, so it’s the first decision you make. There are three options: Standard Cluster, Single Node, and Rack Aware Cluster.
Single Node
Selecting Single Node locks the physical node count to 1 (grayed out , not editable). The Allow for Future Growth toggle remains available. Storage Resiliency expands to include a simplified option not available on multi-node clusters:
| Storage Resiliency Option | Description |
|---|---|
| Two-way mirror | Standard mirrored resiliency |
| Simple (no fault tolerance) | Single drive, single pool , no redundancy |
Tip: Single node clusters will always incur workload downtime during updates. No N+1 capacity is available.
Standard Cluster
The standard multi-node path. Physical node count is selectable from 2 to 16 nodes. The Allow for Future Growth toggle is available. Storage Resiliency options unlock based on node count:
| Node Count | Available Storage Resiliency |
|---|---|
| 2 nodes | Two-way mirror |
| 3–16 nodes | Two-way mirror, Three-way mirror |
Tip: Minimum N+1 capacity must be reserved for Compute and Memory when applying updates (ability to drain a node). Single Node clusters will always incur workload downtime during updates.
Rack Aware Cluster
Rack Aware changes the node selector to a per-rack model. Nodes per rack are limited to fixed options: 2, 4, or 8 (maximum 8 per rack). Storage Resiliency is determined entirely by the per-rack node count:
| Nodes per Rack | Available Storage Resiliency |
|---|---|
| 2 | Two-way mirror only |
| 4 | Four-way mirror only |
| 6 | Four-way mirror only |
| 8 | Four-way mirror only |
Tip: Minimum N+1 capacity must be reserved for Compute and Memory when applying updates (ability to drain a node). Single Node clusters will always incur workload downtime during updates.

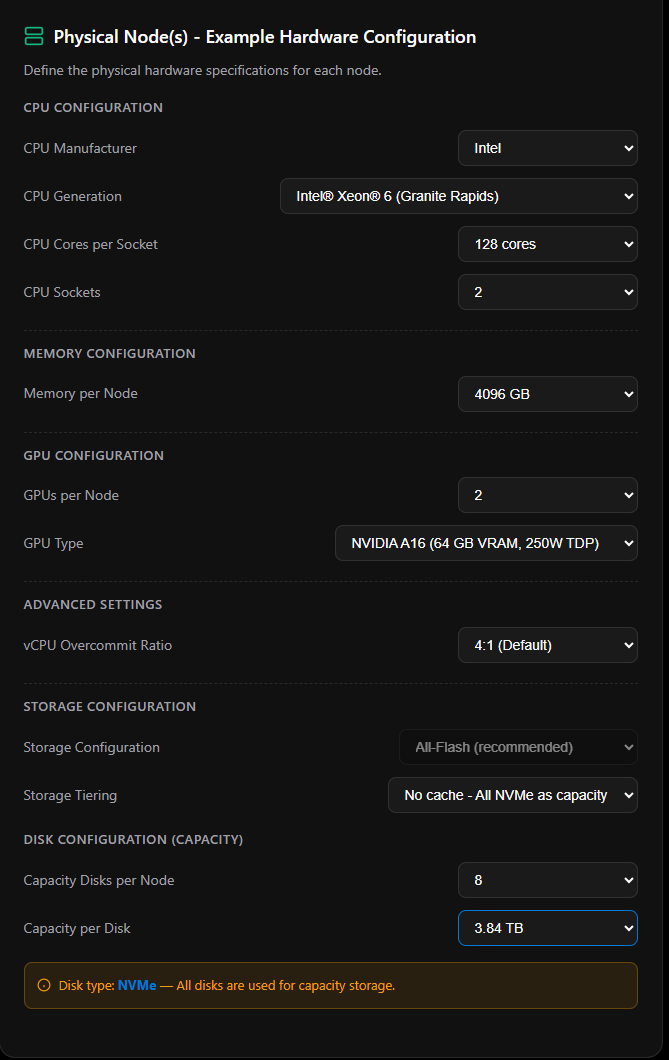
Physical Node Hardware Configuration
This is where the Sizer has matured significantly since it launched. The Physical Node(s) - Example Hardware Configuration panel lets you spec out actual server hardware, and the tool maps those specs directly to usable capacity in real time.
CPU Configuration
| Field | Options |
|---|---|
| CPU Manufacturer | Intel, AMD, Intel (Edge) |
| CPU Generation | Populated dynamically based on manufacturer selection |
| CPU Cores per Socket | Populated dynamically based on generation selection |
| CPU Sockets | 1 or 2 (Azure Local OEM-certified hardware supports 1 or 2 sockets only) |
CPU generation options by manufacturer:
| Manufacturer | Available Generations |
|---|---|
| Intel | 4th Gen Xeon® Scalable (Sapphire Rapids), 5th Gen Xeon® Scalable (Emerald Rapids) |
| Intel (Edge) | Xeon® D-2700 (Ice Lake-D) , 4–20 cores, DDR4-3200, for edge/rugged deployments |
| AMD | Multiple EPYC generations, including 5th Gen EPYC Turin (up to 192 cores/socket, 384 dual-socket) |
💡 AMD Tip: When Intel cores and sockets are maxed and compute utilization reaches ≥80% at the baseline 4:1 overcommit ratio, the Sizer adds a note in the Sizing Notes panel suggesting AMD EPYC Turin as an alternative. Turin offers up to 192 cores per socket (384 dual-socket), which can resolve compute pressure without escalating the vCPU overcommit ratio to 5:1 or 6:1.
Memory Configuration
Memory per Node is a dropdown using server-realistic DIMM-symmetric values:
| Supported Values |
|---|
| 64 GB, 128 GB, 192 GB, 256 GB, 384 GB, 512 GB, 768 GB, 1024 GB, 1536 GB, 2048 GB, 3072 GB, 4096 GB |
Note: 32 GB per node is reserved for Azure Local OS and management overhead and is excluded from workload-available memory in all capacity calculations.
GPU Configuration
| Field | Options |
|---|---|
| GPUs per Node | 0, 1, or 2 |
| GPU Type | NVIDIA A2 (16 GB VRAM, 60W), A16 (64 GB VRAM, 250W), L4 (24 GB VRAM, 72W), L40 (48 GB VRAM, 300W), L40S (48 GB VRAM, 350W) |
GPU Type only appears when GPUs per Node is set to 1 or 2.
Advanced Settings
| Field | Options |
|---|---|
| vCPU Overcommit Ratio | 1:1, 2:1, 4:1 (default), 5:1, 6:1 |
The Sizer will auto-escalate the overcommit ratio (4:1 → 5:1 → 6:1) when cores and sockets are maxed and compute utilization exceeds 90%. A warning appears in the Sizing Notes when this occurs. You can manually set and lock the ratio to override auto-escalation.
Storage Configuration
| Field | Options |
|---|---|
| Storage Configuration | All-Flash (recommended), Mixed All-Flash (NVMe + SSD), Hybrid (SSD/NVMe + HDD) |
| Storage Tiering | Populated dynamically based on storage configuration |
Available tiering options by storage configuration:
| Storage Config | Tiering Options |
|---|---|
| All-Flash | No cache , All NVMe as capacity; No cache , All SSD as capacity |
| Mixed All-Flash | NVMe as cache , SSD as capacity |
| Hybrid | SSD as cache , HDD as capacity; NVMe as cache , HDD as capacity |
Note: Single-node clusters only support All-Flash storage , Hybrid is blocked by the tool.
Disk Configuration
Standard disk sizes available across all tiers: 960 GB, 1.92 TB, 3.84 TB, 7.68 TB, 15.36 TB
All-Flash (single-tier):
| Field | Options |
|---|---|
| Capacity Disks per Node | 2–24 |
| Capacity per Disk | 960 GB / 1.92 TB / 3.84 TB / 7.68 TB / 15.36 TB |
Mixed All-Flash or Hybrid (two-tier):
| Field | Options |
|---|---|
| Cache Disks per Node | 2–8 |
| Capacity per Cache Disk | 960 GB / 1.92 TB / 3.84 TB / 7.68 TB / 15.36 TB |
| Capacity Disks per Node | 2–16 |
| Capacity per Disk | 960 GB / 1.92 TB / 3.84 TB / 7.68 TB / 15.36 TB |
Note: Hybrid storage enforces a 1:2 cache-to-capacity disk ratio. Total drive bays per 2U chassis are capped at 24 (8 cache + 16 capacity). All-Flash configurations support up to 24 capacity disks per node.
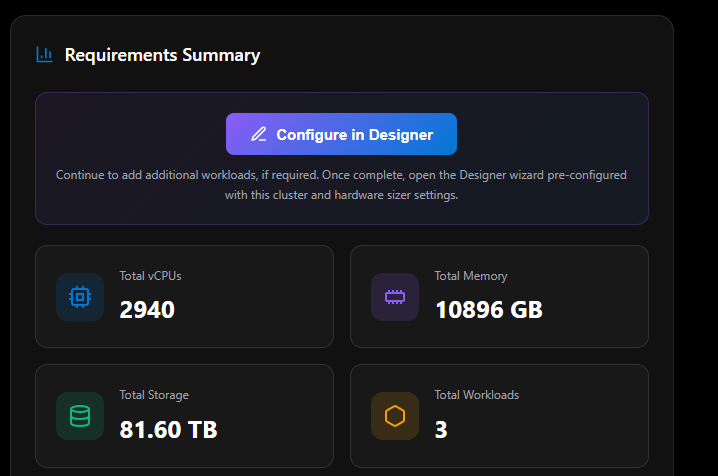
Requirements Summary & Output
This is where the Sizer earns its keep. The output panel on the right side of the page is fully live , every change you make to workloads, cluster configuration, or hardware specs recalculates instantly. No submit button, no page reload. It’s reactive from the moment you land on the page.
But the output panel is not static. It changes significantly as you work, and two sections only appear once you’ve added workloads. That’s intentional , the Sizer is showing you results that are actually meaningful to your specific scenario.
What You See Before Adding Workloads
When you first open the Sizer, the output panel shows placeholder zeroes across Requirements Summary and Per-Node Requirements, with empty capacity bars. The Sizing Notes panel simply tells you to add workloads. The Power & Rack section and the Configure In Designer button are both hidden entirely , they only exist once there’s something worth showing.
What Changes When You Add Workloads
Once you add your first workload, the panel comes alive:
| Output Element | Behaviour |
|---|---|
| Requirements Summary cards | Updates to show aggregate vCPUs, Memory, Storage, and Workload count across all workloads |
| Per-Node Requirements (with N+1) | Shows Physical Cores, Memory, Raw Storage, and Usable Storage per node , with one node already subtracted for maintenance |
| Capacity Usage Bars | Live visual meters for Compute, Memory, and Usable Storage , turn red at ≥ 90% utilization |
| Estimated Power, Heat & Rack Space | Appears for the first time , see below |
| Configure In Designer button | Appears for the first time , the big one, see below |
| Sizing Notes | Populates with cluster config, hardware summary, resiliency details, and any warnings or recommendations |
Tip: The N+1 calculation is always active. Per-node requirements assume one node is offline for servicing , so if you have 4 nodes, the Sizer sizes everything as if only 3 are available. If any capacity bar hits ≥ 90%, the configuration is flagged and you’ll need to add nodes, increase per-node hardware, or reduce workloads before you can proceed to the Designer.
🆕 Configure In Designer , The Big One
This is brand new, and it changes everything about how the Sizer fits into your workflow.
Not long ago, the Sizer and the Odin Designer were two completely separate tools. You’d size your cluster in the Sizer, note down your settings, then go manually re-enter all of it into the Designer from scratch. That gap was a real friction point , especially after spending time getting your hardware config and workloads dialled in.
That’s gone now. The Configure In Designer button is the bridge that connects them, and it only appears once you have workloads configured , which makes sense, because there’s nothing to hand off until you’ve built something worth handing off.
When you click it, the Sizer packages everything , your cluster type, node count, resiliency setting, CPU manufacturer and generation, core count, socket count, memory, GPU, disk configuration, vCPU overcommit ratio, future growth buffer, and every single workload you’ve added , and launches the Odin Designer wizard with it all pre-populated. Not a partial handoff. Everything. You don’t re-enter a single value.
“Continue to add additional workloads, if required. Once complete, open the Designer wizard pre-configured with this cluster and hardware sizer settings.”
This is the kind of feature that sounds small in a changelog but is a genuine quality-of-life leap in practice. If you’ve used both tools before, you’ll feel it immediately.
The button has guardrails built in , it won’t let you proceed with a bad config:
| State | What It Means |
|---|---|
| Enabled | All resources (Compute, Memory, Storage) are below 90% utilization , safe to proceed |
| Disabled / greyed out | One or more resources are at ≥ 90% , the tooltip tells you exactly which ones. Fix utilization first |
| Blocked entirely | Storage exceeds Azure Local supported limits (400 TB/machine or 4 PB per pool) , both export and Designer access are blocked until corrected |
When it passes the cluster type to the Designer, it maps as follows:
| Sizer Cluster Type | Designer Scale |
|---|---|
| Standard Cluster | Hyperconverged (medium) |
| Single Node | Hyperconverged (medium) |
| Rack-Aware Cluster | rack_aware |
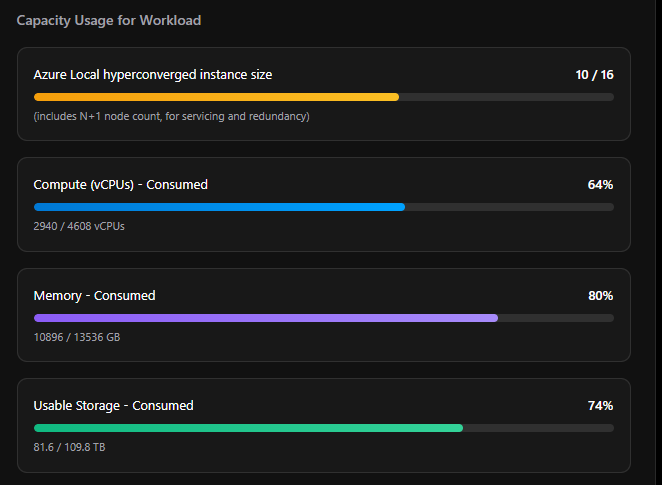
Capacity Usage for Workload
This section shows four live progress bars, each updating in real time as you adjust workloads and hardware. Every bar shows a percentage fill, the current consumed value, and the total available , so you can see exactly where headroom is tight at a glance.
| Bar | What It Measures | Detail |
|---|---|---|
| Azure Local hyperconverged instance size | Nodes used vs. cluster maximum | Shows current node count against max (16 for Standard, 8 for Rack-Aware, 1 for Single Node). Includes a note: “includes N+1 node count, for servicing and redundancy” |
| Compute (vCPUs) - Consumed | vCPUs required vs. vCPUs available | Based on physical cores × vCPU overcommit ratio × effective nodes (N+1 applied) |
| Memory - Consumed | Workload memory vs. available node memory | 32 GB host overhead deducted per node before calculating available memory |
| Usable Storage - Consumed | Workload storage vs. usable capacity | Accounts for resiliency multiplier, Infrastructure_1 volume (256 GB reserved), and S2D repair reservation |
Any bar that reaches ≥ 90% turns red and triggers a warning banner , and disables the Configure In Designer button until resolved.
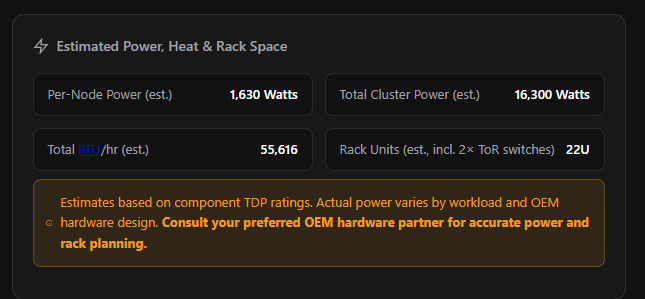
Estimated Power, Heat & Rack Space
The second section that appears only after workloads are added. This is the Sizer doing the data centre math for you , estimating how much power your cluster will draw, how much heat it will generate, and how many rack units it will consume.
| Field | How It’s Estimated |
|---|---|
| Per-Node Power (est.) | CPU TDP scaled to selected core count (40% base + 60% proportional to cores) × sockets, plus 4W per DIMM (1 DIMM per 32 GB RAM), 8W per NVMe/SSD disk or 12W per HDD, 16W for 2× OS boot disks, GPU TDP × count per node, and 150W base overhead for motherboard, fans, NICs, BMC, and PSU efficiency loss |
| Total Cluster Power (est.) | Per-Node Power × node count |
| Total BTU/hr (est.) | Total Watts × 3.412 |
| Rack Units (est.) | 2U per node, plus 2U for 2× Top-of-Rack switches on multi-node clusters (no switch overhead for single-node) |
Important: These are TDP-based estimates only. Real-world power consumption varies by workload intensity, hardware design, and OEM implementation. The Sizer itself says it best: “Consult your preferred OEM hardware partner for accurate power and rack planning.” Use these numbers for early-stage data centre capacity conversations, not final facility design.
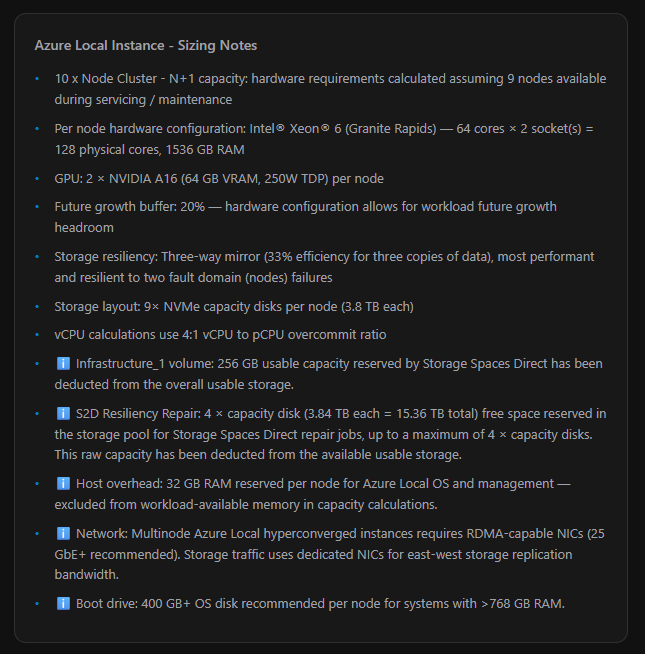
Azure Local Instance - Sizing Notes
This is one of the most underappreciated parts of the Sizer. Below the Power & Rack section sits a dynamic, auto-generated bullet list that builds a complete plain-English narrative of your sizing configuration , every decision the Sizer has made, every reservation it has applied, every warning it needs to surface. It’s the Sizer explaining its own work.
The notes update live with every change. Here’s what gets generated and why:
| Note | What It’s Telling You |
|---|---|
| N+1 cluster summary | Always first. States your node count and confirms how many nodes are assumed available during servicing , e.g. “10 x Node Cluster , hardware requirements calculated assuming 9 nodes available during servicing / maintenance” |
| Per-node hardware config | Summarises the CPU, core count, socket count, and RAM for each node , e.g. “Intel® Xeon® 6 (Granite Rapids) , 64 cores × 2 socket(s) = 128 physical cores, 1536 GB RAM” |
| GPU config | Only shown when GPUs are configured , e.g. “GPU: 2 × NVIDIA A16 (64 GB VRAM, 250W TDP) per node” |
| Future growth buffer | Confirms the growth % applied to all workload calculations |
| Storage resiliency | Full description of the chosen mirror type, efficiency, and fault tolerance |
| Storage layout | Exact disk config per node , count, type, and size , e.g. “9× NVMe capacity disks per node (3.84 TB each)” |
| vCPU overcommit ratio | States the ratio in use , or warns if it was auto-escalated above the default 4:1 |
| ℹ️ Infrastructure_1 volume | Flags that 256 GB usable capacity is reserved by Storage Spaces Direct and has been deducted from available storage |
| ℹ️ S2D Resiliency Repair | Explains the raw storage pool reservation for Storage Spaces Direct repair jobs , up to 4 × capacity disks deducted from usable storage |
| ℹ️ Host overhead | Confirms 32 GB RAM per node is reserved for the Azure Local OS and management stack, excluded from workload memory |
| ℹ️ Network | Reminds you that multi-node Azure Local requires RDMA-capable NICs (25 GbE+ recommended) with dedicated NICs for east-west storage traffic |
| ℹ️ Boot drive | Only shown for nodes with > 768 GB RAM , recommends a 400 GB+ OS disk |
| ⚠️ Warnings | If compute, memory, or storage utilization hits ≥ 90%, explicit warnings appear here naming the overloaded resource and what to do about it |
| 💡 AMD tip | If you’re on Intel with maxed cores and compute is ≥ 80% at baseline 4:1 ratio, the Sizer suggests switching to AMD EPYC Turin for additional core headroom |
The Sizing Notes are also fully included in the Word export , so when you hand a report to a stakeholder or OEM partner, every assumption and reservation is documented in plain language, not buried in a spreadsheet.
Export & Session Options
| Option | How It Works |
|---|---|
| Save as PDF | Triggers the browser print dialog , save to PDF from there |
| Download Word | Generates a complete Word-format sizing report including cluster config, hardware config, requirements summary, per-node breakdown, capacity utilization, workload list, and all sizing notes |
| Auto-Save | Your entire session , workloads, hardware settings, cluster config , is automatically saved to the browser. Closing and reopening the page will offer to resume where you left off |

Room for Growth & Community Momentum
Since I first wrote about the Sizer, the team has added full hardware specification inputs , CPU manufacturer and generation, memory, GPU, disk count, disk capacity, and disk type , which changes this from a rough workload estimator into something much closer to a real pre-sales sizing tool. It’s still Preview and you should validate with your OEM, but the pace of improvement is impressive. When the Sizer first launched, hardware inputs were minimal and it fell well short of dedicated tools like Pieter Teeling’s Sizer (part of his broader Azure Local work at teeling.ai). Recent updates have closed those gaps, with full CPU, memory, GPU, and disk specification inputs now in place, it’s genuinely comparable for most pre-sales Azure Local sizing scenarios.
Odin Knowledge
The Knowledge section is Odin’s comprehensive documentation hub but here’s the key insight: it’s currently laser-focused on a single, critical topic. The sidebar is titled “Odin for Azure Local | Outbound Connectivity Guide v1.0”, which tells me this is a deep dive into one of the most complex aspects of Azure Local deployments rather than a broad knowledge base.
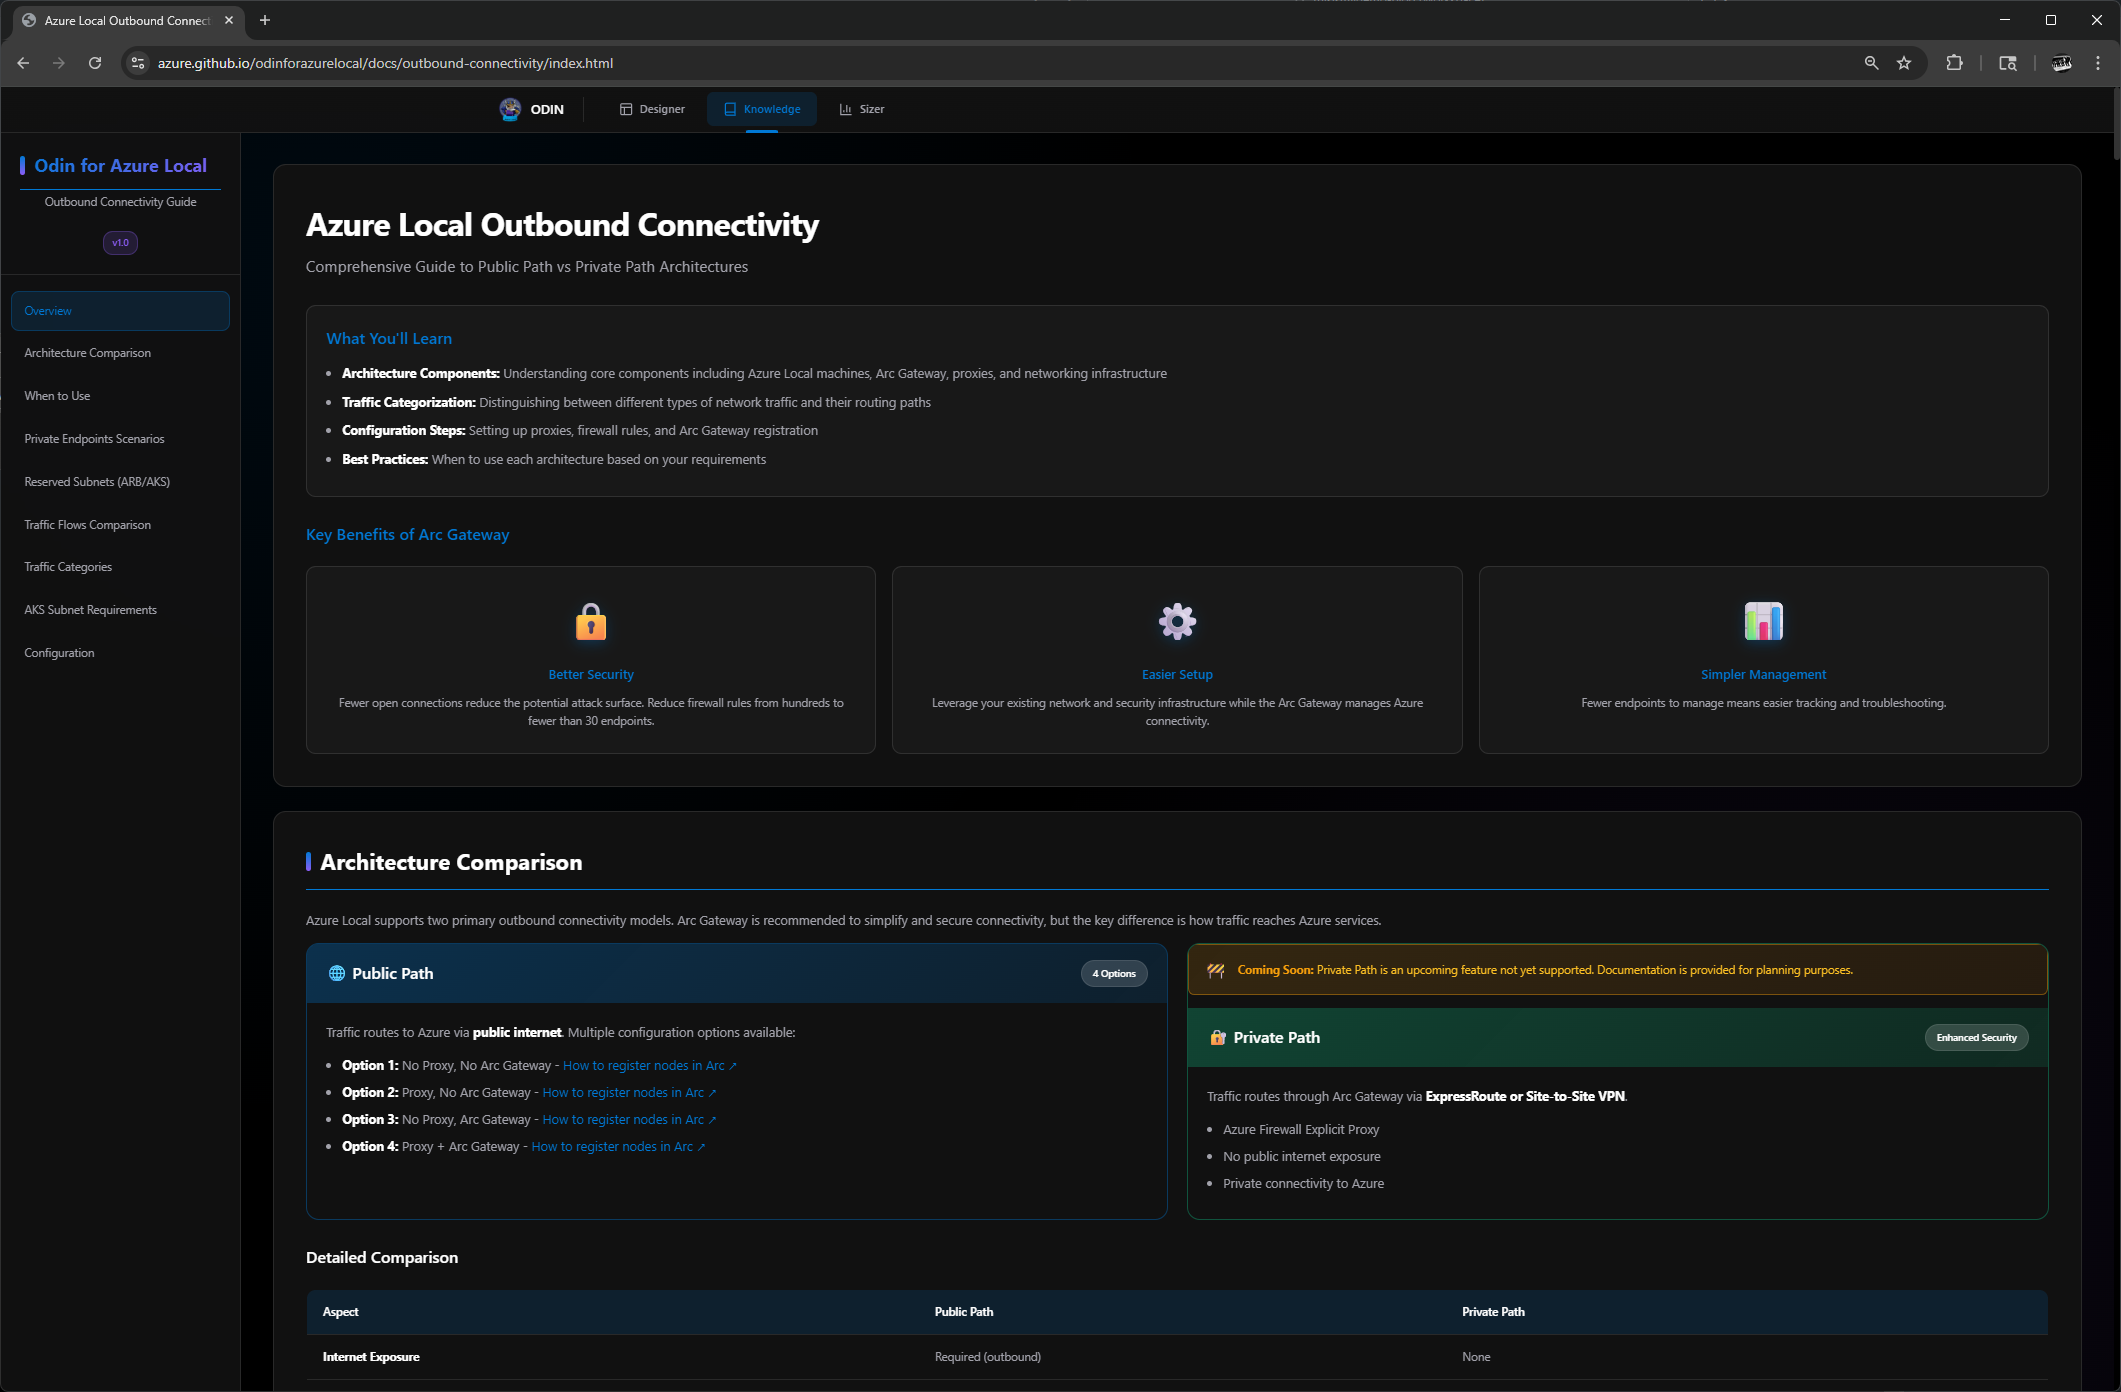
What You’ll Learn
The guide opens with a clear summary of what’s covered:
- Architecture Components: Understanding core components including Azure Local machines, Arc Gateway, proxies, and networking infrastructure
- Traffic Categorization: Distinguishing between different types of network traffic and their routing paths
- Configuration Steps: Setting up proxies, firewall rules, and Arc Gateway registration
- Best Practices: When to use each architecture based on your requirements
Sidebar Navigation
The sidebar breaks down into focused sections:
- Overview
- Architecture Comparison
- When to Use
- Private Endpoints Scenarios
- Reserved Subnets (ARB/AKS)
- Traffic Flows Comparison
- Traffic Categories
- AKS Subnet Requirements
- Configuration
Public Path vs. Private Path: The Core Decision
The heart of this guide is helping you choose between two connectivity architectures:
Public Path (4 options available now):
- Traffic routes to Azure via public internet
- Uses on-premises proxy and firewall infrastructure
- Arc Gateway recommended to reduce firewall rules from hundreds to fewer than 30 endpoints
- Options range from no proxy/no Arc Gateway (simplest) to proxy + Arc Gateway (best security)
Private Path (coming soon):
- Traffic routes through ExpressRoute or Site-to-Site VPN, no public internet exposure
- Requires Azure Firewall Explicit Proxy hosted in Azure
- Arc Gateway required for HTTPS traffic
- Single validated configuration (no mix-and-match options)
The guide includes detailed comparison tables, traffic flow diagrams for each step (bypass, HTTP, HTTPS, ARB, AKS, VMs), and clear guidance on when to choose each architecture.
Arc Gateway Benefits
One of the standout sections covers why Arc Gateway matters:
- Better Security: Fewer open connections reduce attack surface; firewall rules drop from hundreds to fewer than 30 endpoints
- Easier Setup: Leverage existing network infrastructure while Arc Gateway manages Azure connectivity
- Simpler Management: Fewer endpoints means easier tracking and troubleshooting
Private Endpoints Deep Dive
The guide goes into excellent detail on Private Endpoints configuration for:
- Azure Key Vault (keep public during deployment, restrict after)
- Azure Storage/Blob (required for 2-node cloud witness)
- Azure Container Registry (no wildcards supported, specific FQDNs required)
- Azure Site Recovery (two routing options with SSL inspection considerations)
It also warns about reserved IP ranges for Arc Resource Bridge (10.244.0.0/16, 10.96.0.0/12), if your private endpoints overlap these ranges, traffic will fail.
Configuration Scripts
The guide includes ready-to-use PowerShell scripts for all four Public Path registration options, complete with proxy bypass examples and verification commands.
My Take
Scanning through this Knowledge section, I’m impressed by the depth. It’s not trying to cover everything, it’s doing one topic extremely well. For anyone wrestling with Azure Local networking decisions, especially around Arc Gateway, private connectivity, and firewall rules, this is genuinely useful documentation.
I’d love to see Odin expand this approach to other complex topics (storage architecture, SDN configuration, identity options), but as a focused v1.0 on outbound connectivity, it delivers.
Odin Designer (Main Configuration Wizard)
Last but not least, and what I think is the most important part of Odin, is the Designer!
The following section I have tried to keep up to date since I frist started to use Odin. However the team updating this tool is fixing and updating recommenations very fast and things that we had recommened to change have already been changed.
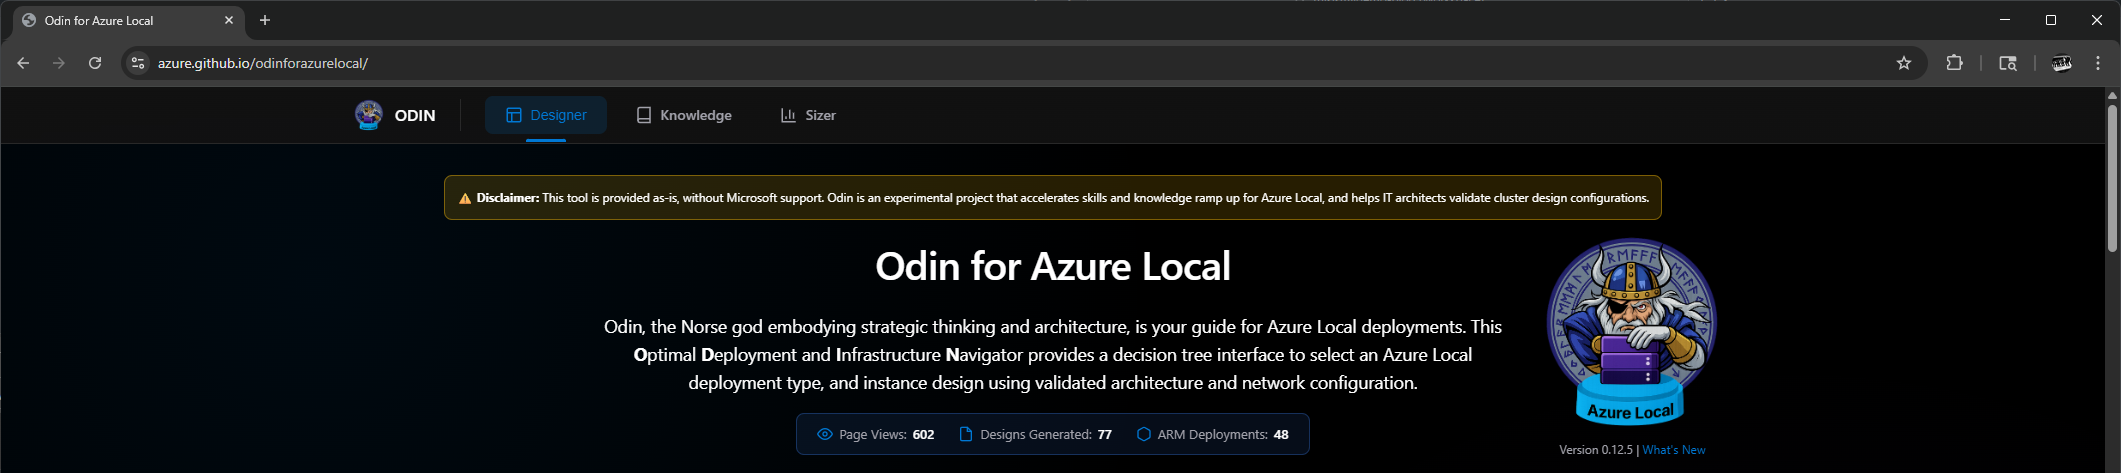
The tool opens with a statement about what Odin is:
Odin, the Norse god embodying strategic thinking and architecture, is your guide for Azure Local deployments. This Optimal Deployment and Infrastructure Navigator provides a decision tree interface to select an Azure Local deployment type, and instance design using validated architecture and network configuration.
From my viewpoint, someone who already has a lot of the deployment automated and pretty decent documentation built around design and implementation, I was very impressed with the Designer out of the box. I ran into some UI issues, but those can be fixed. Since this is not fully released and not an official Microsoft product, it’s something that can be of use for those just starting their journey with Azure Local.
That said, whoever uses this tool needs a good understanding and core knowledge of Hyper-V, Storage Spaces Direct, and the basics of what Azure Local is, what Software Defined Networking is, Active Directory, and so on.
There’s also a big disclaimer at the top of the page, please read it!
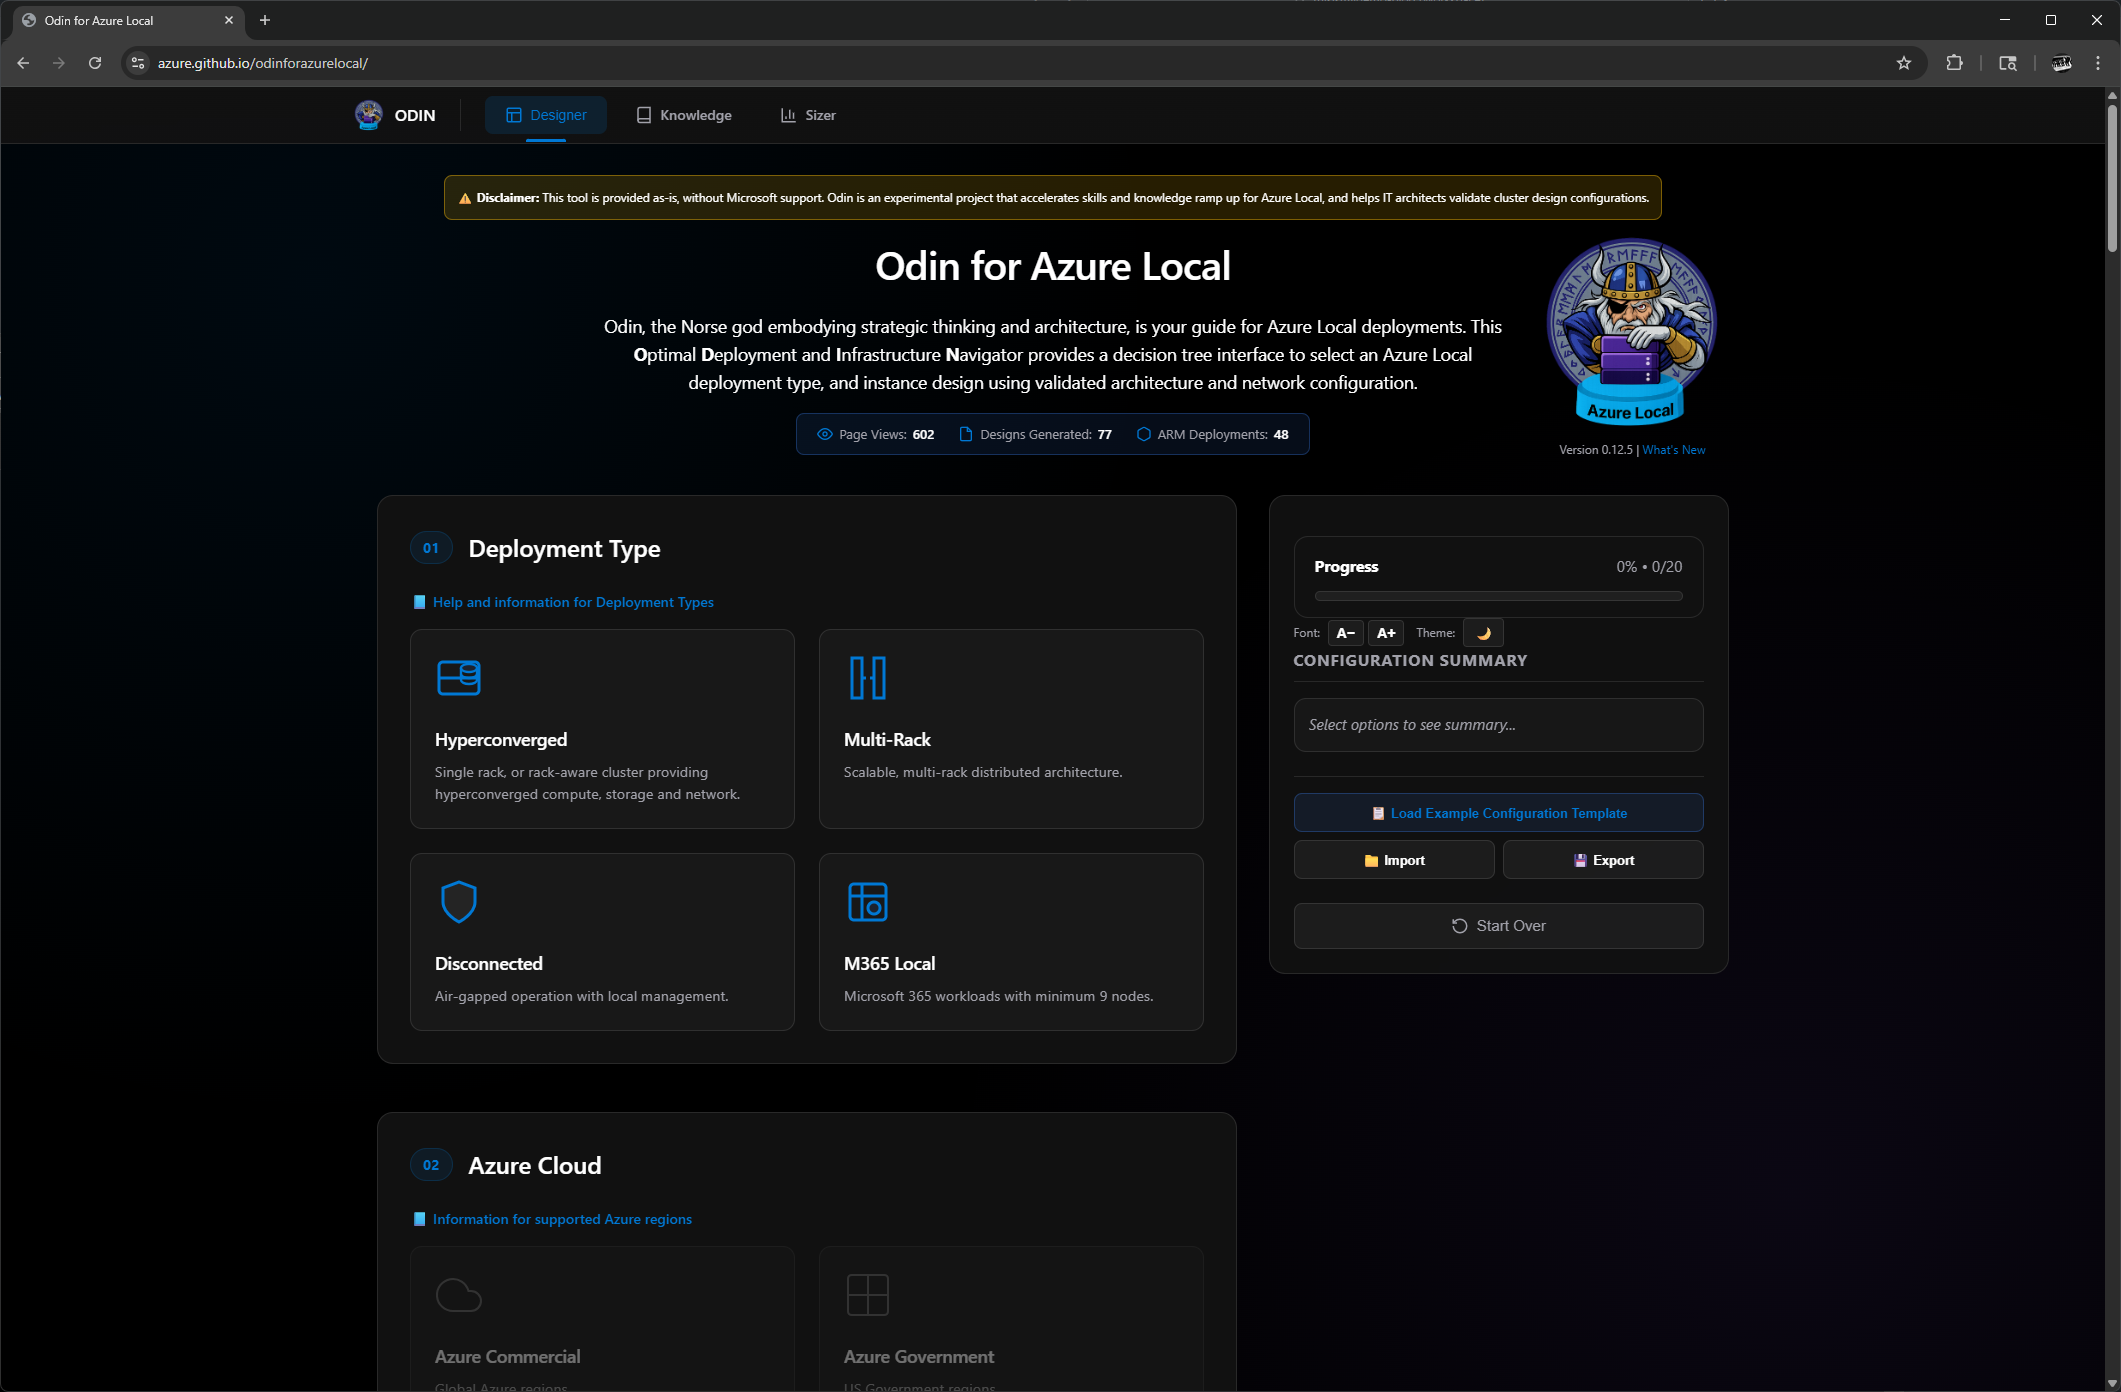
Disclaimer: This tool is provided as-is, without Microsoft support. Odin is an experimental project that accelerates skills and knowledge ramp up for Azure Local, and helps IT architects validate cluster design configurations.
The Designer is split into sections. On the right side of the page is a progress and configuration summary section that updates as you make your selections. In some ways, this is an Azure Local Planning “Choose Your Own Adventure” being led by the Norwegian God Odin!
Let’s walk through each section.

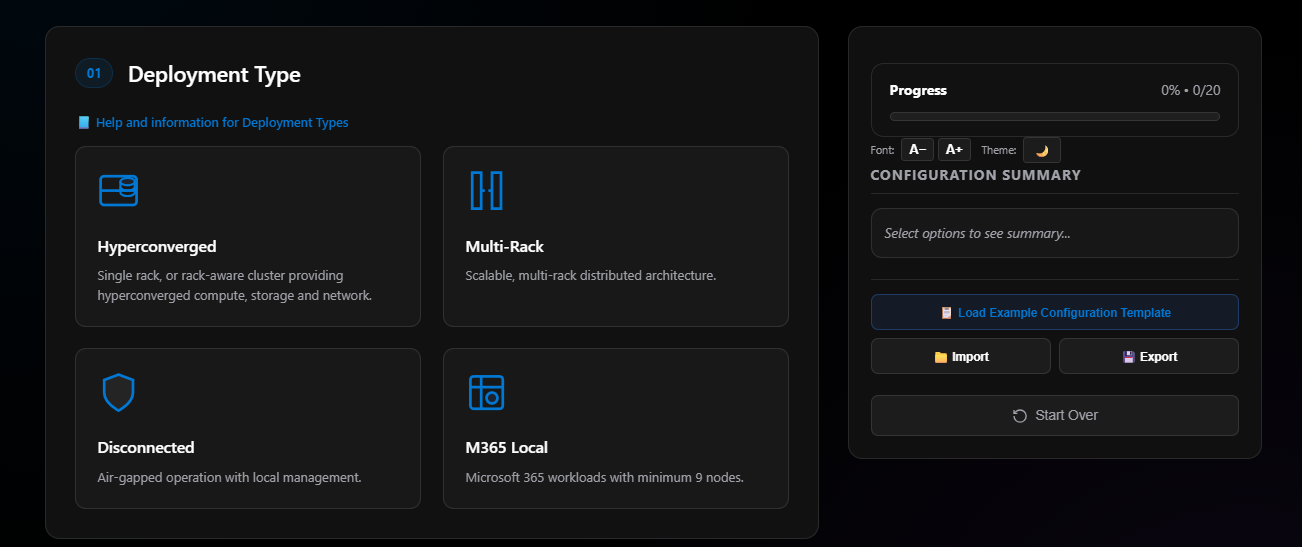
Section 01: Deployment Type
Each option enables other options with various different choices. The deployment types are:
- Hyperconverged: What we’re all used to with Azure Stack HCI, Windows Storage Spaces Direct, vSAN, and now Azure Local. Hyperconverged means compute, storage, and network together.
- Multi-Rack Clusters: Just went GA in the 2601 release of Azure Local.
- Disconnected: Air-gapped operation with local management.
- M365 Local: Microsoft’s new sovereign cloud solution.
For this blog, I’m picking Hyperconverged as my deployment type.
Note: With each section there are help and information links that are very useful.
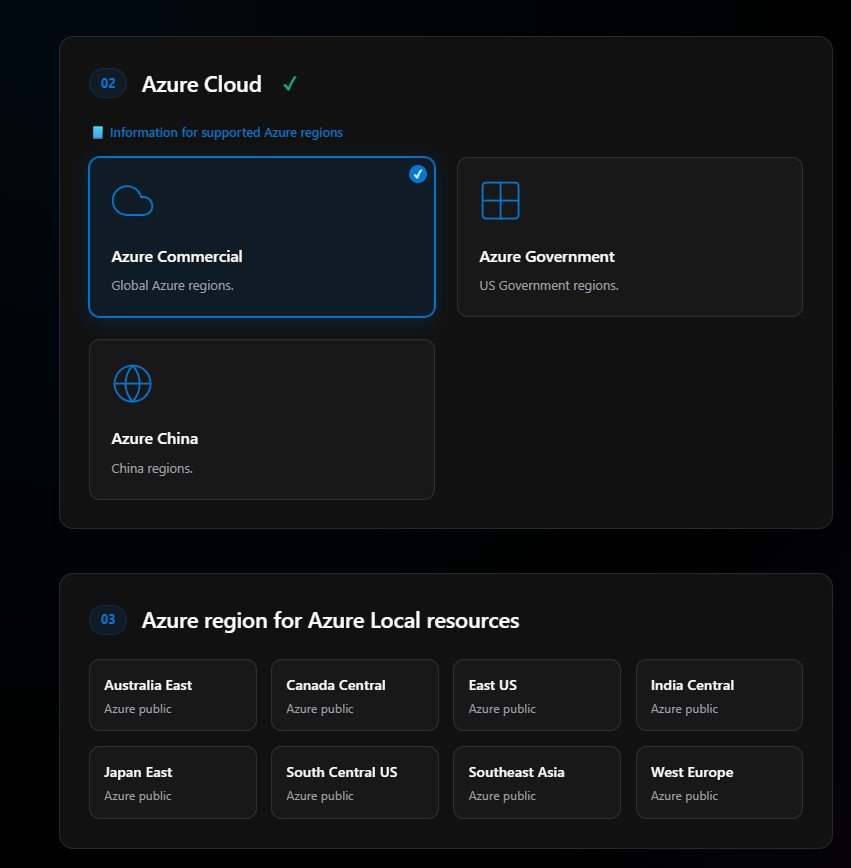
Section 02: Azure Cloud
Options include:
- Azure Commercial (Public Cloud)
- Azure Government
- Azure China
I don’t know if Azure Local is even supported in Azure China yet, it may be in Private Preview. Azure Government was announced not long ago but is only in one region at this time. Azure Public only has two US regions available for Azure Local currently.
I’ll pick Azure Commercial for Step 2.
Section 03: Region
As soon as I select Azure Commercial, step three becomes active. This is where I pick what region I’m placing my Azure Local resources in. I’ll choose South Central US, the only other US region is East US at this time.
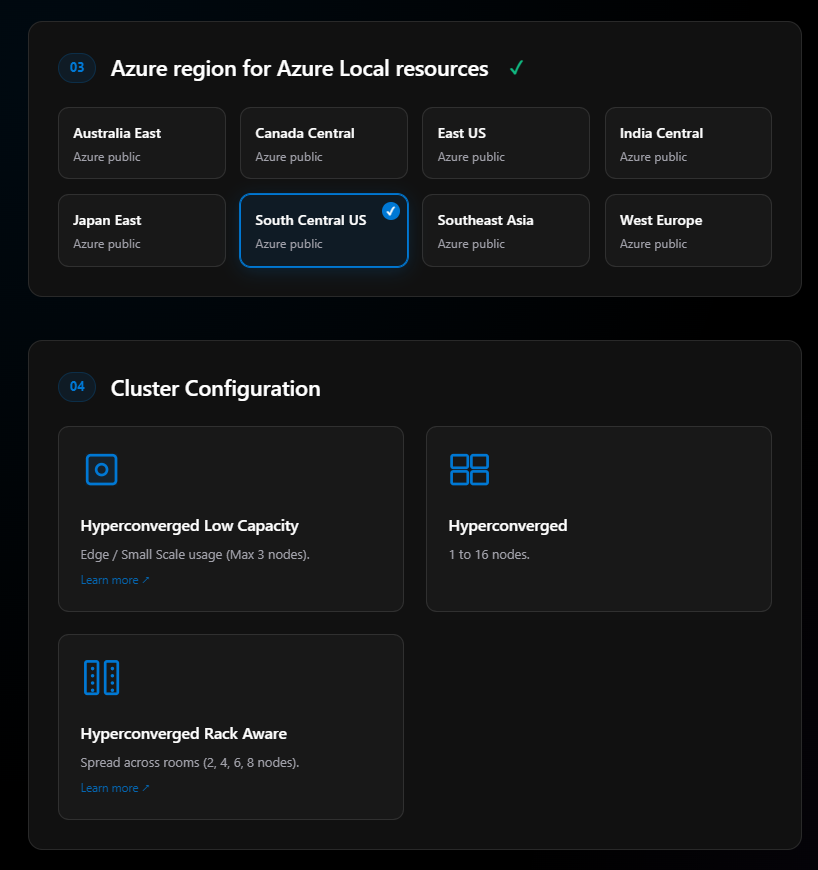
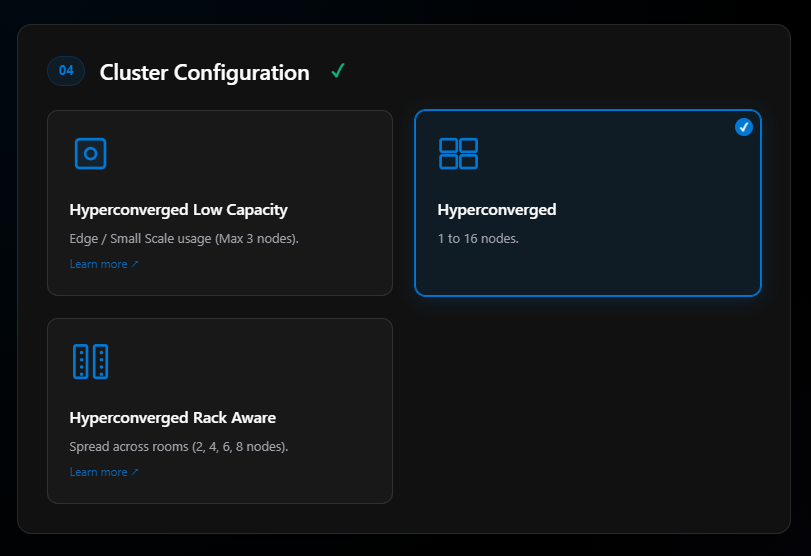
Section 04: Cluster Configuration
Options include:
- Hyperconverged Low Capacity , Still in preview
- Hyperconverged , Standard configuration
- Hyperconverged Rack Aware , Just went GA in build 2601
I’m selecting Hyperconverged.
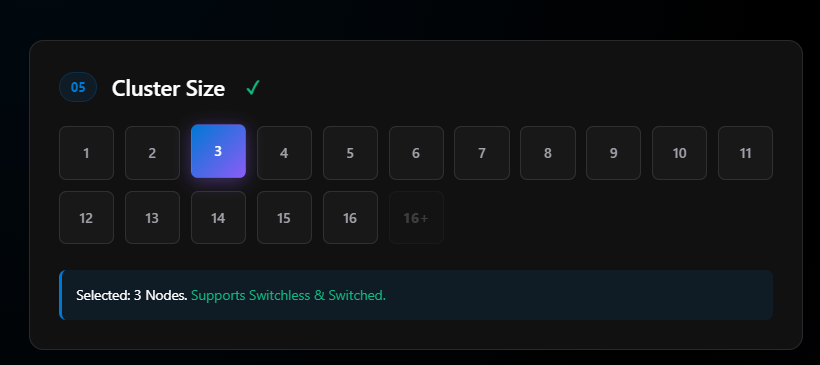
Section 05: Cluster Size
For this blog, I’m picking 3 nodes. Most of my clusters have been 2-node deployments, but I wanted to pick 3 nodes because it gives us more options in upcoming steps like witness configuration, mirroring options, and so on.
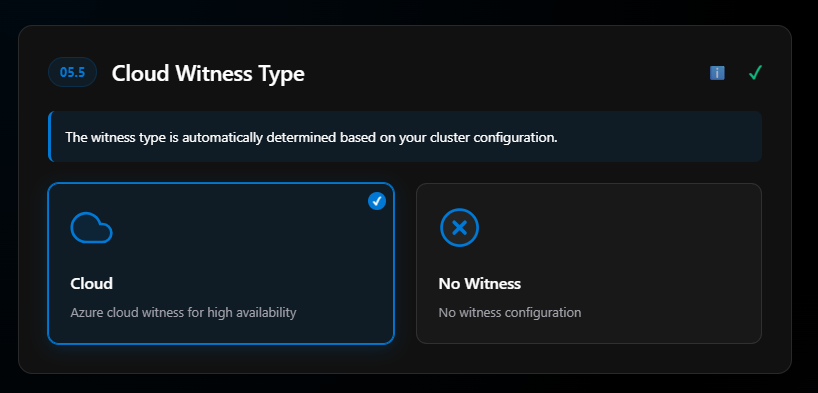
Section 05.5: Cloud Witness
For two nodes, a witness is a must. However, with 3 or more nodes you don’t technically have to have a witness. I don’t understand why not, in my mind, even a 3-node cluster should have a witness. In fact, my 4-node clusters still use a witness.
More info on cluster witnesses.
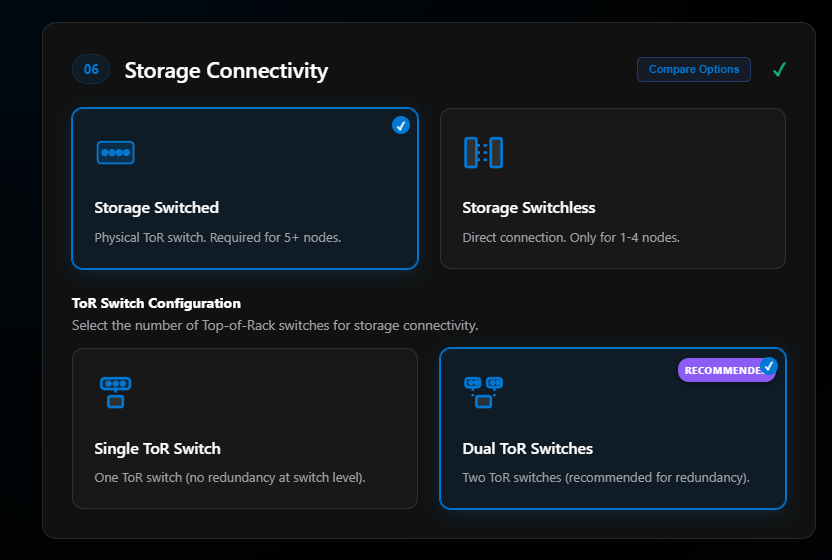
Section 06: Storage Connectivity
Here we have a big decision that should have already been made before you even start. Did you buy expensive top-of-rack switches that may be overkill in price just for 2 or 3 node solutions?
For some people, the cost of 2 top-of-rack switches that meet Microsoft’s networking requirements can lead to a big price tag for this project. Hence why you can do switchless.
Switchless doesn’t mean you don’t need switches, you still need switches for management and compute traffic, but those requirements are not as rigid. Switchless just means the storage is connected on network adapters that are connected directly between nodes and not going through a switch. This is great for 2 or 3 node solutions. Some do it with 4, but more nodes means more network adapters, which means higher cost.
Something to keep in mind is growth. If you’re going to scale out these clusters past 3 nodes, I would stay with storage switched. If you don’t and have to grow later, this means a redeployment of your cluster.
I’m going to do Storage Switched. Once selected, the step expands to allow ToR Switch Config. The options are single ToR switch or dual ToR switches. Never go single. Never, never, never. I’ll choose Dual ToR Switches for redundancy.
Section 07: Network Adapter Ports
There’s a lot to this decision that one should make before even ordering the hardware.
Normally, people order either Intel or Nvidia network adapters. For Dell, as an example, all my nodes come with two Nvidia ConnectX-6 network adapters (the ones that support 100 Gb). Each network adapter has 2 ports. My Dells also come with a Broadcom network adapter with two ports at 1 Gb.
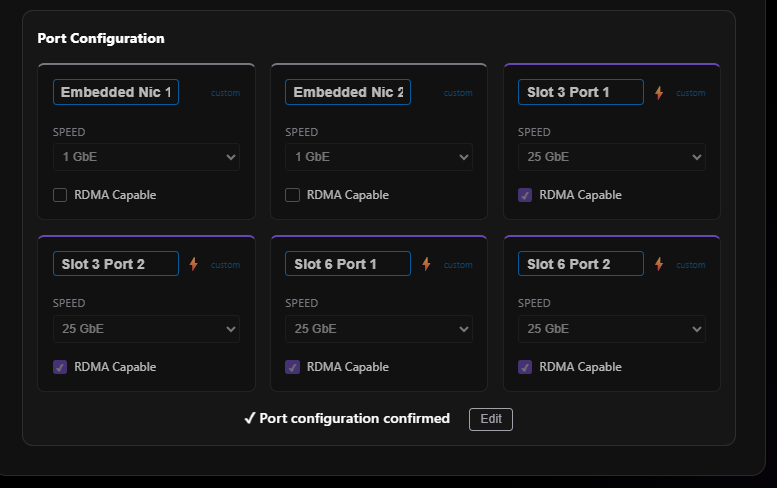
In most cases, we just use the Nvidia ConnectX adapters giving me 4 ports. For this demo, because I can, I’m selecting 6 ports.
Once I select 6 ports, section 7 expands giving us our port configuration. Here is where we can declare the port speeds and if they are RDMA capable, highly important for storage intents.
I did some custom edits on Port 1 and Port 2. Those two ports represent the two ports on my Broadcom 1 Gb network adapters. The rest I leave as 25 GbE even though my switch and cards can handle 100 GbE.
This is one of the areas that the ODIN team quickly updated after some recommendatoins. Last week, there was no way to name your network adapters the way they would show in the OS, so when you would export to ARM or other formats the naming was not correct. However since last week this has changeed.
This is one of the areas that the ODIN team quickly updated after some recommendations. Last week, there was no way to name your network adapters the way they would show in the OS, so when you would export to ARM or other formats the naming was not correct. However, since last week this has changed.

Now we can actually name the nework adapters which is going to be a big help when we create our diagrams and ARM templates later. Now, I can see my 6 network adapters and ports, the names that will show up in the OS and also the same name that we will use for ARM template deployments or Portal Deployments. This is a very helpful update.
Now we can actually name the network adapters, which is going to be a big help when we create our diagrams and ARM templates later. Now, I can see my 6 network adapters and ports, the names that will show up in the OS, and also the same name that we will use for ARM template deployments or Portal Deployments. This is a very helpful update.
Section 08: Network Traffic Intents
I’m picking Custom for my network traffic intents. More information on network intents.
Immediately I see a NOT SUPPORTED message pop up:
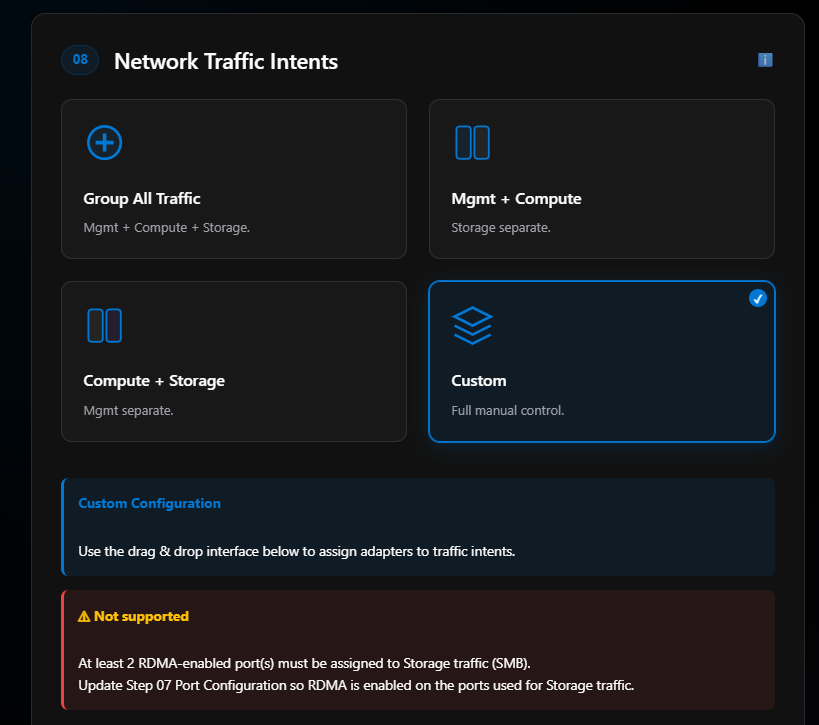
At least 2 RDMA-enabled port(s) must be assigned to Storage traffic (SMB). Update Step 07 Port Configuration so RDMA is enabled on the ports used for Storage traffic.
This is expected since I marked my Embedded NIC 1 and Embedded NIC 2 as not being RDMA compatible. This is fine, those two ports are going to be for management traffic anyway.
Next I play the match game of ports with intents:
- Embedded NIC 1 and Embedded NIC 2 → Management intent
- Slot 3 Port 1 and Slot 6 Port 2 → Compute intent (on different adapters for HA)
- Slot 3 Port 2 and Port 6 Port 1 → Storage intent (on different adapters for HA)
For HA and resiliency, I’ll have cabled Slot 3 Port 1 and Slot 6 Port 2 to Switch 00, and Slot 3 Port 2 and Slot 6 Port 1 to Switch 01. That way if a card goes out or a switch goes down, I still have physical connectivity between my nodes and my top-of-rack switch. Also, with our Dell AX-760 the Network Adapter in Slot 6 is upside down. For physically cabling this is important to know.
For HA and resiliency, I’ll have cabled Slot 3 Port 1 and Slot 6 Port 2 to Switch 00, and Slot 3 Port 2 and Slot 6 Port 1 to Switch 01. That way if a card goes out or a switch goes down, I still have physical connectivity between my nodes and my top-of-rack switch. Also, with our Dell AX-760 the Network Adapter in Slot 6 is upside down. For physical cabling, this is important to know.
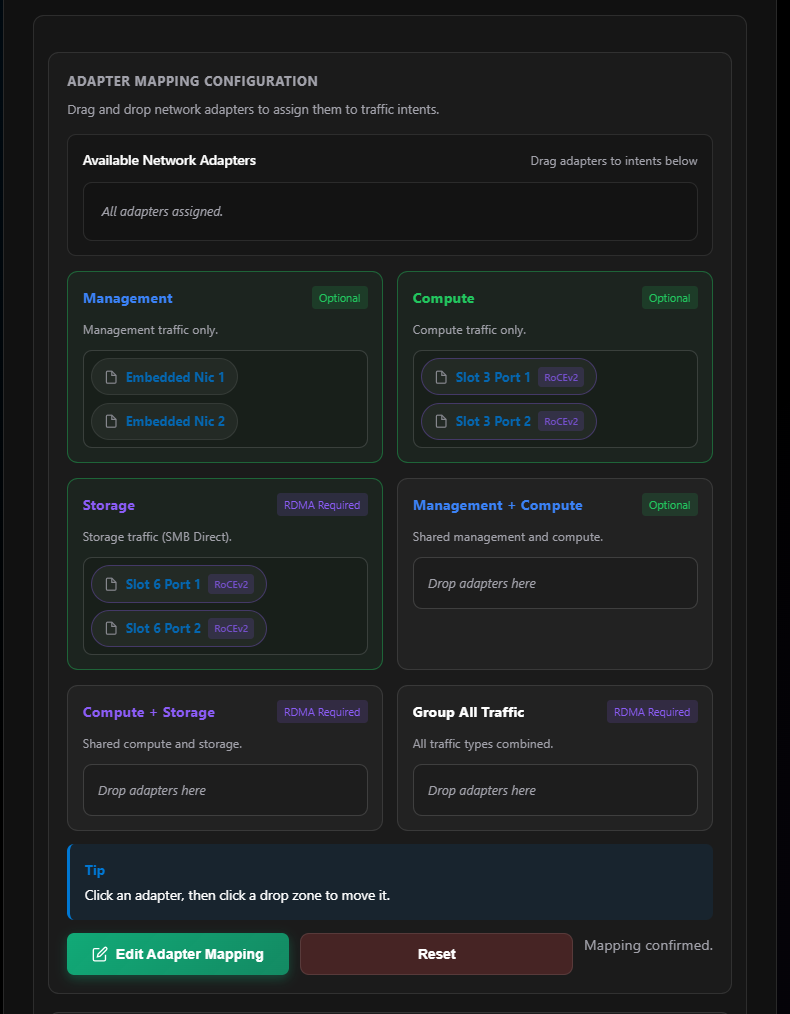
Why do I use three intents? In most cases I normally just do 2 (compute/management + storage) and sometimes just 1 fully converged intent. But in some cases, like where I work, my company manages the management network, but the customer manages everything on top of the hypervisors. We’ve also deployed 3 intents where we had management/compute, storage, and then another separate compute intent.
Other examples: you may have requirements to physically separate your networks for various reasons, legacy backup networks, different switches, and so on.
The last part of Section 08 covers overrides on those intents. Management and compute intents don’t really need RoCEv2 or iWARP. Jumbo frames may come into play with compute. I always bump my jumbo frames to 9014, I’m not sure why Microsoft defaults to 1514.
The last part of Section 08 covers overrides on those intents. Management and compute intents don’t really need RoCEv2 or iWARP. Jumbo frames may come into play with compute. I always set my jumbo frames to 9014, I’m not sure why Microsoft defaults to 1514.
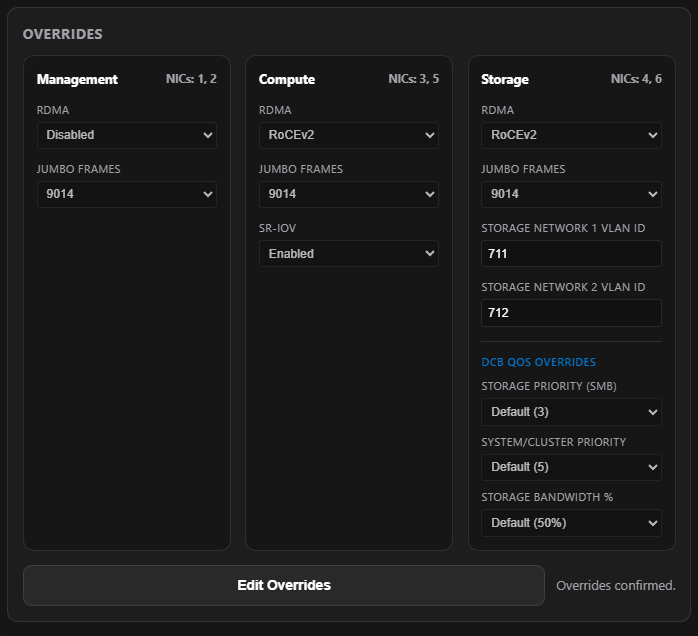
For the storage intent, note the VLAN section. Since we’re using only two ports for the storage intent, we only need 2 storage VLANs. These VLANs are not routable past the top-of-rack switch, basically just east/west on those switches. Microsoft defaults to VLAN 711 and 712. In a fully converged solution with 4 ports for storage/compute/management, you’d see 4 storage VLANs: 711, 712, 713, and 714.
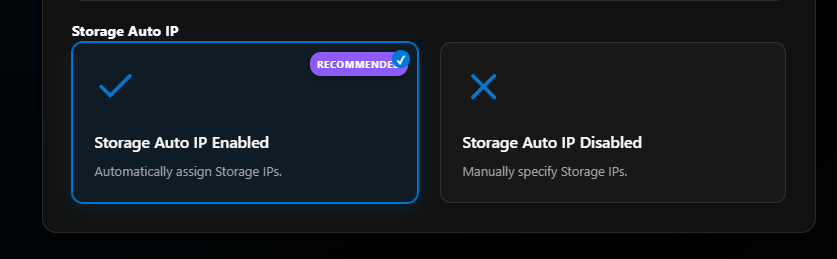
Last for Section 08 is Storage Auto IP. In most cases, leave this default to enabled. There isn’t really a need to statically assign the storage port IPs. Microsoft uses 10.71.1.x for port 1 and 10.71.2.x for port 2. More on custom storage IPs.
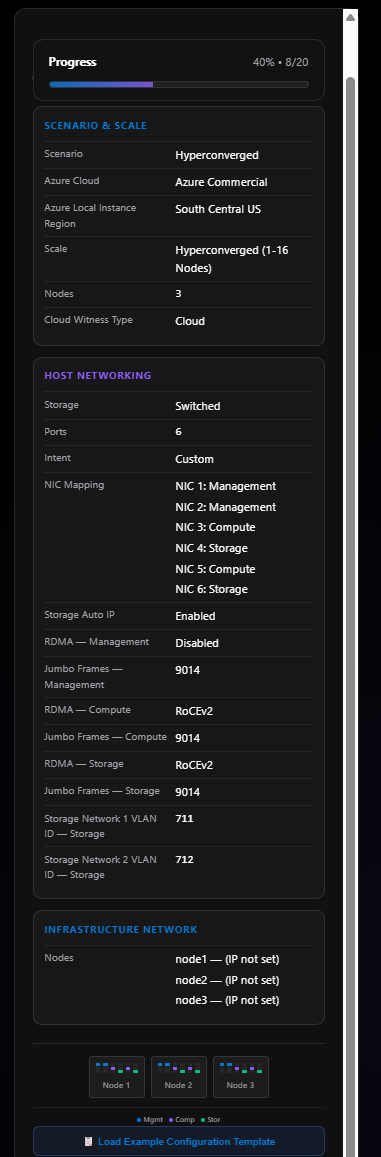
Before we move to Section 09, check the sidebar on the right, our progress is now 40% (8/20 decisions made) and we can see some of the configuration populated.
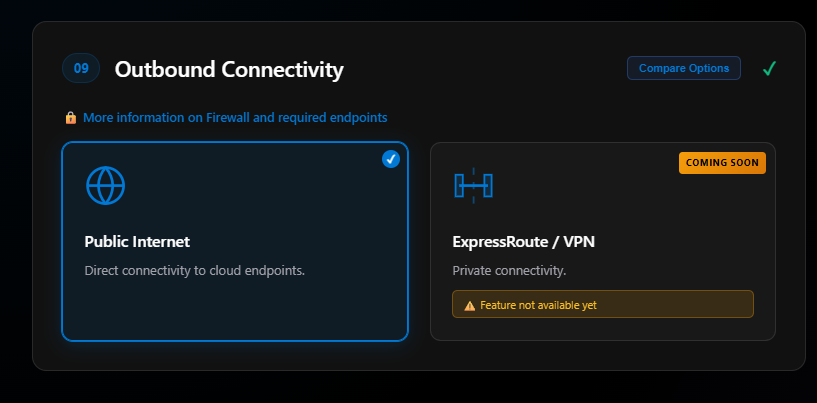
Section 09: Outbound Connectivity
This is a section that in the near future will be important to have made major decisions around. This also is a section where the Knowledge section will help with decision making. More on firewall requirements.
There’s a Compare button that compares Public Path vs. Private Path:
Public Path
Pros:
- Simpler initial setup
- Lower cost (no ExpressRoute/VPN required)
- Uses existing on-premises proxy/firewall infrastructure
- Multiple configuration options (4 scenarios)
Cons:
- Requires public internet egress
- Traffic routes through public endpoints
- More firewall rules if not using Arc Gateway
Use Cases:
- Standard deployments with reliable internet
- Existing on-premises proxy/firewall infrastructure
- Cost-sensitive environments
- Public internet egress acceptable per security policy
Recommended: For most deployments with internet connectivity
Private Path (ExpressRoute)
Pros:
- Zero public internet exposure
- Traffic stays on private network
- Azure Firewall provides centralized security
- Highest security posture
- Compliance-friendly for regulated industries
Cons:
- Higher cost (ExpressRoute + Azure Firewall)
- More complex initial setup
- Requires Arc Gateway + Azure Firewall Explicit Proxy
- ExpressRoute or Site-to-Site VPN required
Use Cases:
- Zero public internet exposure required
- Government, healthcare, financial industries
- Existing ExpressRoute or Site-to-Site VPN
- Regulatory/compliance requirements mandate private connectivity
For this blog I’m selecting Public Internet. The Private Connection (ExpressRoute/VPN) option shows “Coming Soon, Feature not available yet.”
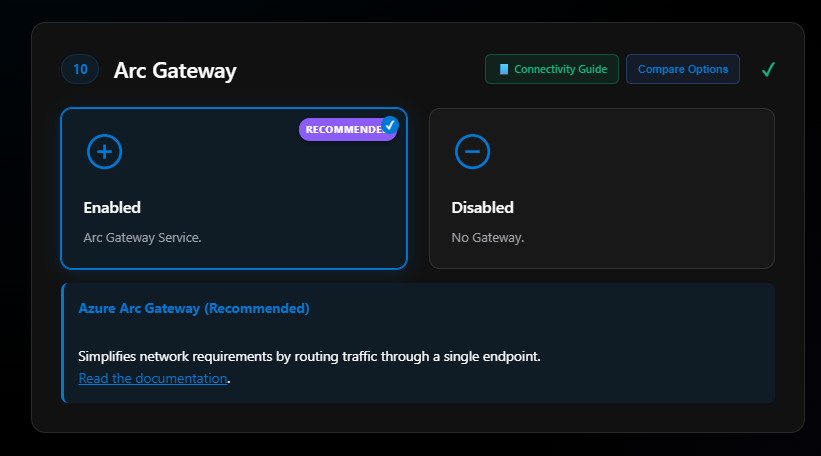
Section 10: Arc Gateway
All my deployments moving forward will use Arc Gateway. At the top of this section is a link to the connectivity guide which is in the Knowledge section. There’s also a Compare button:
Arc Gateway Enabled
Pros:
- Reduces firewall rules from hundreds to fewer than 30 endpoints
- Enhanced security posture
- Simpler firewall management
- Required for Private Path (ExpressRoute)
Cons:
- Additional Arc Gateway resource required
- Slightly more complex initial setup
Use Cases:
- Security-focused deployments
- Limited internet egress policies
- Private Path (ExpressRoute) deployments
- Simplified firewall rule management
Recommended: Recommended for all deployments
Arc Gateway Disabled
Pros:
- Simpler initial configuration
- One less Azure resource to manage
Cons:
- Hundreds of firewall rules required
- More endpoints to manage and troubleshoot
- Not supported for Private Path (ExpressRoute)
Use Cases:
- Simple deployments with unrestricted internet
- Testing and development environments
Recommended: For simple deployments only
I use Arc Gateway for all my deployments now. I’ll select Enable. More on Arc Gateway.
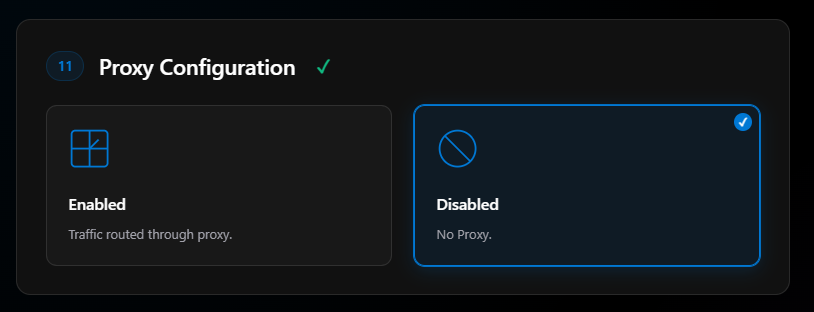
Section 11: Proxy Configuration
I’ll click Disable. This will come into play more once the private connection in Section 09 is released.
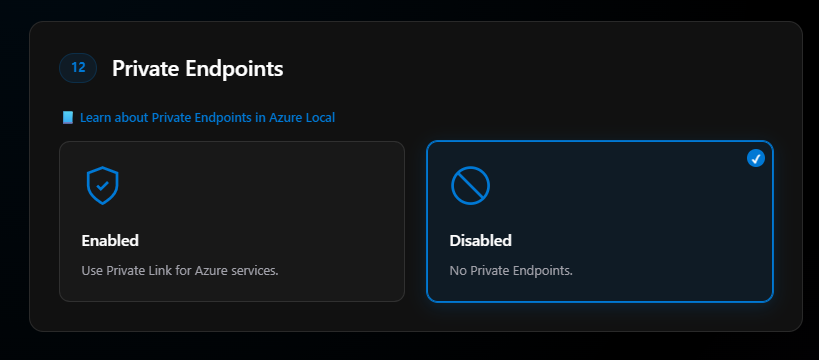
Section 12: Private Endpoints
More information on private endpoints is in the Knowledge section.
I’ll choose Disabled for now. Some private endpoints are not yet supported with Azure Local, and the design and configuration for private endpoints needs more thought.
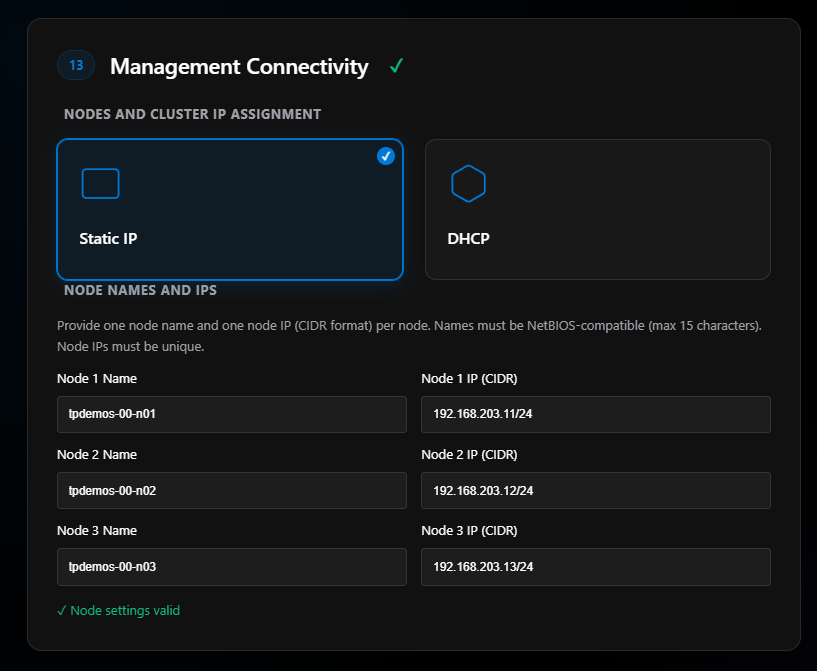
Section 13: Management Connectivity
Here we pick static or DHCP-assigned IP addresses for our management network. I use Static, always have and won’t change. If you choose DHCP, make sure you have a reservation set. You do not want your node IP addresses changing. That is bad!
When you click Static, it will need the node names and the node IP (CIDR) addresses.
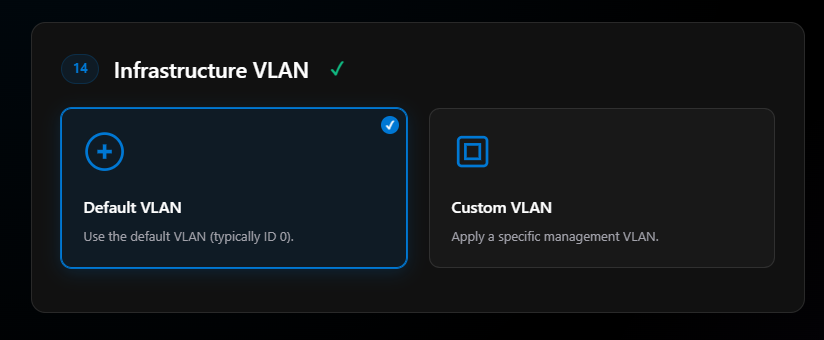
Section 14: Management VLAN
If you have to assign your network adapters a VLAN, this is where you specify it. In most cases the management VLAN is using 0 and handled by the ports on the switch.
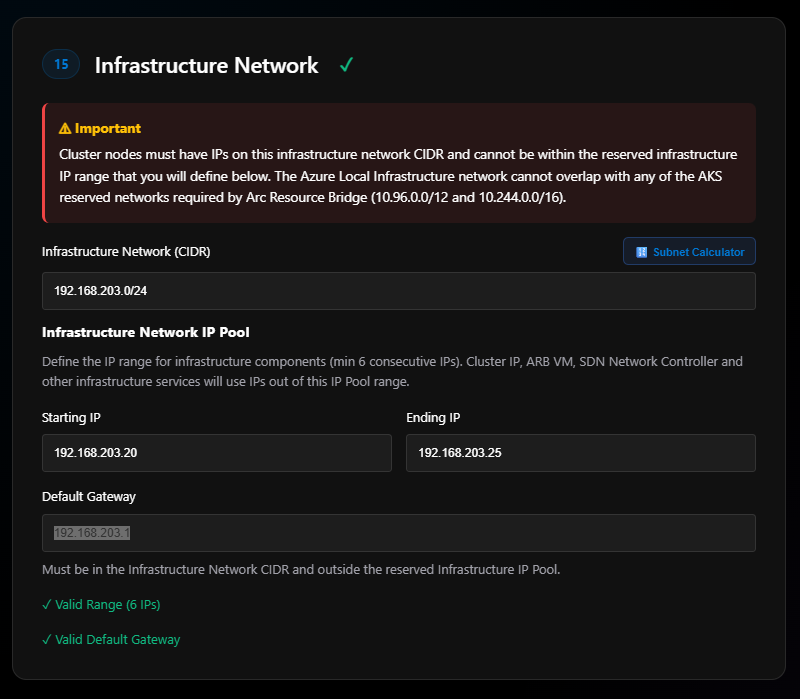
Section 15: Infrastructure Network
This is a range of IPs needed for cluster infrastructure. One IP is used for the cluster IP, then 2 are used by the ARB VM, and the rest are used by the SDN network controller and other infrastructure services.
Note: The first IP in this range will be the cluster IP.
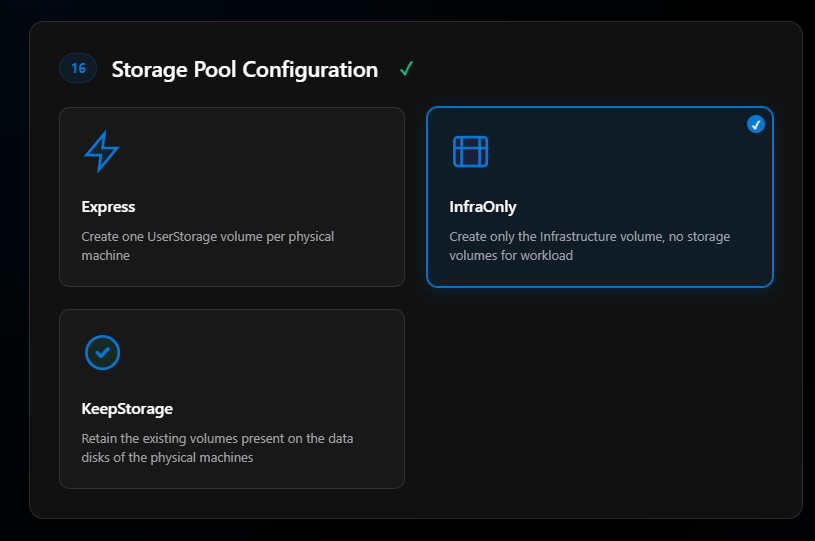
Section 16: Storage Pool Configuration
This is where you tell the deployment to create the infrastructure volume and then a user storage volume for each physical machine. Basically, it creates a Cluster Shared Volume named “Infrastructure” (about 250 GB), and if you select Express, in my 3-node case it will create 3 CSVs with generic names (UserStorage01, 02, 03) across the available storage in your storage pool.
For some this is good. I don’t like this, I prefer to create my own storage after the cluster is deployed, so I’ll select InfraOnly.
You also have a choice to keep existing storage, which means if these nodes had been a cluster and you’re redeploying for some reason, that data will be preserved.
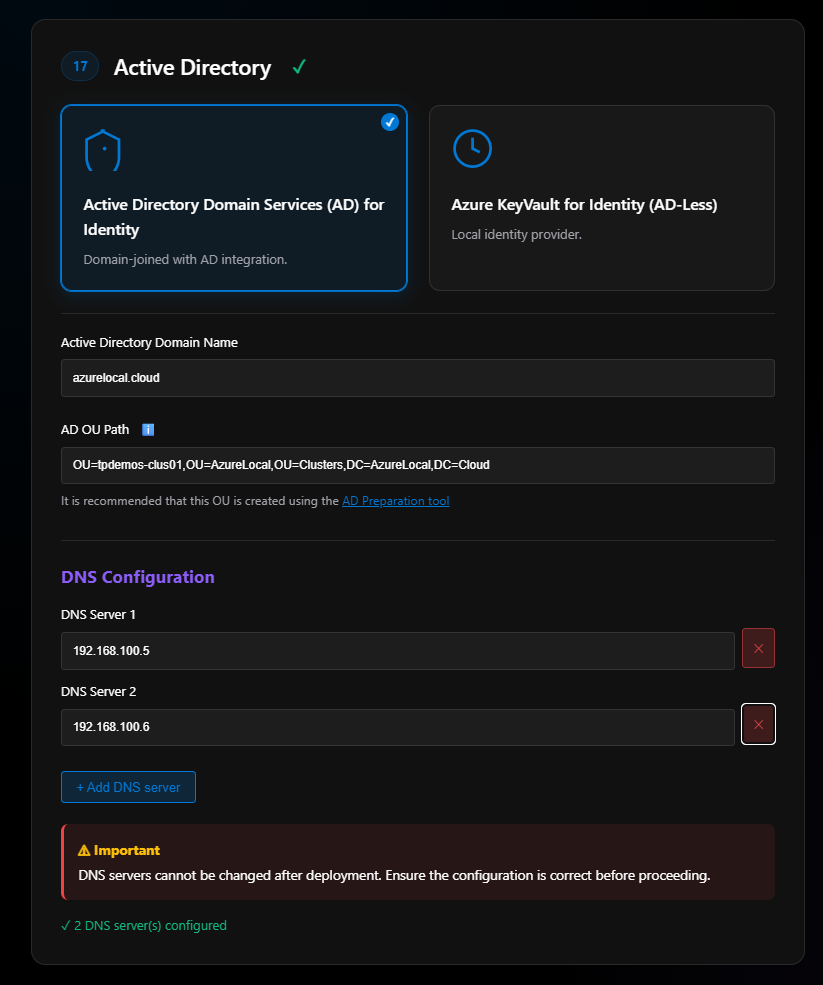
Section 17: Active Directory
Options:
- Active Directory Domain Services (AD) , Traditional identity
- Azure Key Vault for Identity (AD-less) , Local identity provider, still in preview
I have deployed the Key Vault option and it seems to work. This helps if you have remote sites without AD infrastructure, you still need DNS but no AD.
For this blog, I’ll pick Active Directory. Once selected, the section expands asking for:
- Active Directory name (not your Entra ID tenant)
- OU path for cluster resources (LCM account, cluster nodes, cluster object)
- Domain controller IP addresses
Important: DNS servers cannot be changed after deployment. Ensure the configuration is correct before proceeding.
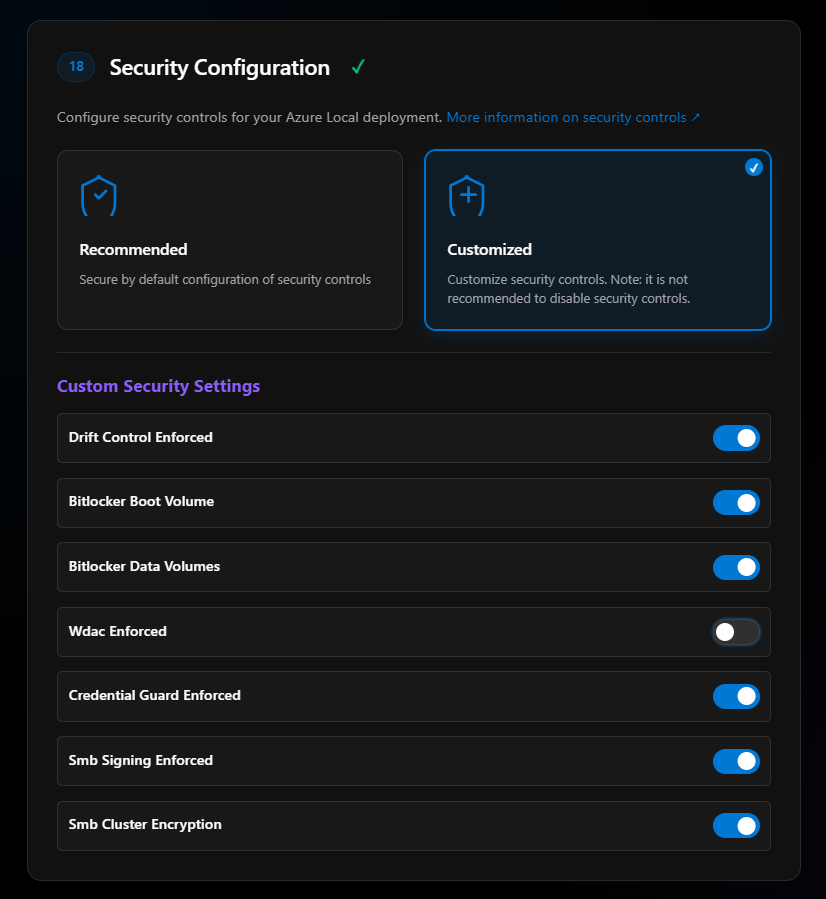
Section 18: Security Configuration
In most cases, select Recommended. I do not, I customize mine.
Why? Because I don’t like WDAC!
More on security for Azure Local.
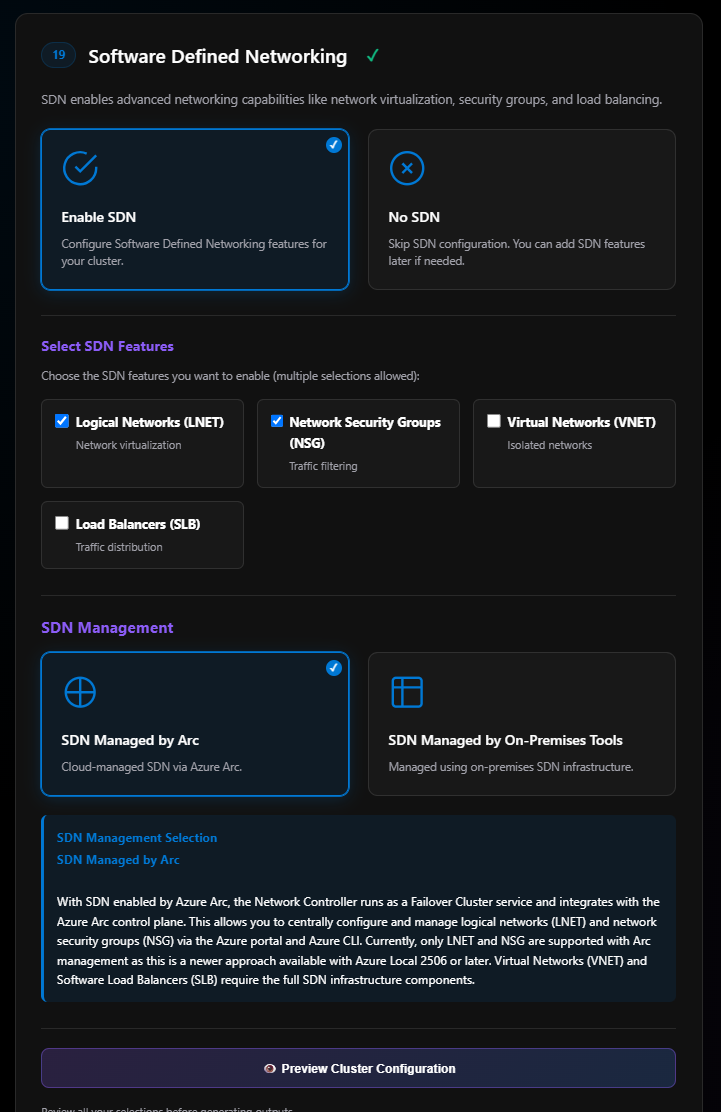
Section 19: Software Defined Networking
Most people will select No SDN at this point and move on. For this blog, I’ll select Enable SDN.
Once enabled, it shows SDN feature options. Read about Azure Arc-managed SDN on Azure Local.
The only two options supported by SDN managed by Azure Arc right now are:
- Logical Networks (LNET)
- Network Security Groups (NSG)
Once those are selected, click SDN Managed by Arc. At this time, do not select “SDN managed by on-premises tools.”
Generating Reports and ARM Templates
Now we’re ready to preview our cluster configuration! This pops up an overview of the config. If “Configuration Complete” is green at the bottom, click Generate Report.

The report is broken into sections:
- R1: Report metadata
- R2: Configuration Summary
- R3: Validation Summary
- R4: Decision and Rationale
The report comes with nice detailed diagrams and is very thorough with many links to supporting documentation. The diagrams can be exported as SVG in light or dark mode. For example, the diagram for storage is nice. You can see how the swtiches are mapped to each network intent and which ports below to each network intent.

The outbound connectivity diagram is very nice as well.

This is another section that the ODIN team took some suggestions and updated the tool. Last week all we could do with these reports where being able print it, download as Word, or download/print as PDF. As of the current release, we can now export to Mark Down as well, which rocks for those of use who do nothing but Mark Down for documenation these days.
This is another section that the ODIN team took some suggestions and updated the tool. Last week, all we could do with these reports was print them, download as Word, or download/print as PDF. As of the current release, we can now export to Markdown as well, which rocks for those of us who do nothing but Markdown for documentation these days.

Over on the side menu to the right, there’s a way to export the configuration to .json files.
Finally, the ability to Generate Cluster ARM Deployment Files.
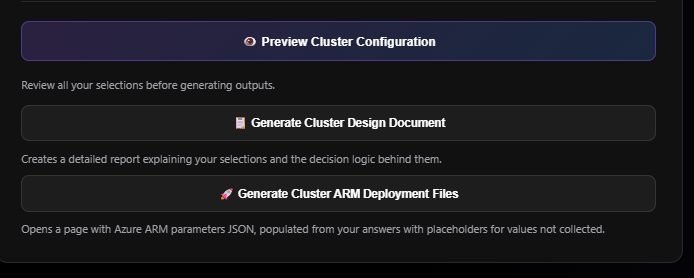
When you click the button, another window opens: “Odin for Azure Local - ARM Parameters JSON.”
- Section A1: Metadata
- Section A2: Enter your Tenant ID, Subscription ID, Resource Group, and deployment name
Section A2 will ask for the following placeholder values:
- Cluster Name
- Key Vault name
- Diagnostic storage account name
- Local admin credentials
- Deployment (LCM) credentials
- HCI resource provider object ID
- Arc node resource IDs
- OU path (optional)
- Custom location name (optional)
Once entered, click Update Parameters JSON and it will update the JSON file that can be seen in Section A5.
- Section A3: Deploy to Azure button and links to sample ARM templates
- Section A4: Deployment Script Generation, export PowerShell scripts, Azure CLI scripts, and links to Bicep and Terraform examples
- Section A5: The Parameter file JSON, copy and paste into VS Code and replace values as needed
- Section A6: Integration Features, export Azure DevOps Pipeline template, GitHub Actions workflow, and a section about REST API for Automation (coming soon)
Designer: Final Thoughts
The Designer is the heart of Odin. It walks you through 20 decision points, validates your choices against Microsoft’s requirements, and generates documentation and deployment artifacts. For anyone learning Azure Local or validating a design, this is genuinely valuable.
The generic port naming is frustrating (I really want to see adapters and their ports grouped together), and some features are still “coming soon.” But the structured approach, the helpful comparison buttons, and the quality of the generated documentation make this a tool worth using.
Things I’d like to see changed or added:
Export as Markdown - Implemented In Recent Release , Right now you can only export as Word or PDF. Markdown export would be much more useful for those of us who work in code-based documentation systems.
Diagram export as Draw.io or Visio , The diagrams are nice, but SVG-only export is limiting. Draw.io or Visio formats would allow for easier editing and integration into existing documentation. (Coming Soon!)
Network Adapters with port mapping , Implemented In Recent Release - Show which port is on which network adapter. This is important for the ARM template and for anyone cabling a cluster.
Network Adapter names , Implemented In Recent Release - Let us name the adapters, not just Port 1, Port 2, etc. This is also important for deployment and makes the generated documentation much more useful.
ARM template needs more work , The ARM template export is nice, but there’s still a lot of manual work to do after export. More complete templates or better placeholders would help.
Summary: Strengths, Gaps & Wishlist
| Feature | Status | Notes |
|---|---|---|
| Core Tools | ||
| Sizer Tool | Good | Capacity planning for workloads |
| Knowledge Base | Excellent | Comprehensive connectivity guidance |
| Designer Wizard | Good | 19-step configuration process |
| Strengths | ||
| Network Intents | Excellent | Drag-and-drop, maps to Network ATC |
| Deployment Types | Good | Full scenario coverage |
| Identity Options | Good | AD or Key Vault |
| Security Config | Good | Secure defaults + customization |
| Reporting | Good | Design docs with decision logic |
| Limitations | ||
| Low Capacity Clusters | Caution | Not GA, verify before production |
| Network Adapter ID | Gap | Generic ports only, maintain your own mapping |
| ExpressRoute/VPN | Coming Soon | Private connectivity not yet available |
| Private Endpoints | Limited | Arc Resource Bridge not supported |
| SDN Features | Limited | Only 2 of 5 with Arc-managed SDN |
| Wishlist | ||
| Markdown Export | Completed | HTML only |
| Draw.io Export | Missing | SVG only |
| Full ARM Templates | Missing | Parameters only, no CI/CD pipelines |
| REST API | Missing | Not publicly documented |
Who Should Use Odin?
Valuable for:
- IT architects validating Azure Local design decisions
- Pre-sales engineers building configuration proposals
- Training and enablement teams learning Azure Local
- Documentation efforts requiring baseline architecture
Not a replacement for:
- Azure Portal deployment workflow
- Hardware compatibility validation
- Production deployment automation
Tips for success:
- Use Odin early in planning to understand decision points
- Don’t rely on non-GA features for production
- Maintain your own hardware mapping documentation
- Verify SDN requirements before selecting features
- Export and supplement generated documentation with your own details
Conclusion
Odin for Azure Local is a valuable community tool for planning and learning, but remember its experimental status. The Sizer, Knowledge Base, and Designer work together to provide a comprehensive planning experience, from capacity estimation to connectivity architecture to configuration generation.
It’s not perfect. Generic adapter naming is frustrating, SDN guidance needs clarity, and export capabilities are limited. But it’s free, actively maintained (version 0.12.5), and provides a structured approach to Azure Local deployment planning.
Use it as one tool in your planning toolkit, not as sole source of truth, but as a way to organize thinking and generate baseline documentation. The Network Intent visualization and Knowledge Base alone make it worth exploring. Use it as one tool in your planning toolkit, not as the sole source of truth, but as a way to organize thinking and generate baseline documentation. The Network Intent visualization and Knowledge Base alone make it worth exploring. Tool URL: azure.github.io/odinforazurelocal
Resources
Odin Links:
Microsoft Documentation:
- Azure Local Overview
- Azure Local Scalability Deployments
- Low Capacity System Requirements
- Rack Aware Cluster Overview
- Network Traffic Intents
- Local Identity with Key Vault
- Firewall Requirements
- Security Features
This review is based on Odin for Azure Local version 0.12.5. The tool is experimental and not officially supported by Microsoft. Features and capabilities may change in future versions. This review is based on Odin for Azure Local version 0.14.52. The tool is experimental and not officially supported by Microsoft. Features and capabilities may change in future versions.